
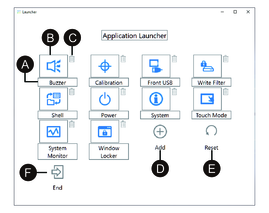
Launcher Functions
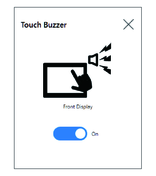
Buzzer
Sets the sound on/off when you perform touch-panel operations.
Default: On
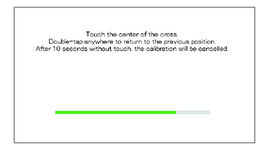
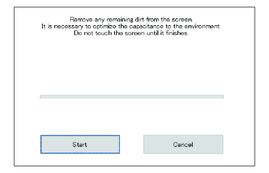
Calibration
Calibrates the touch coordinates.
Calibration screen instructions are different between analog resistive film and projected capacitive (P-CAP) displays. Perform calibration as per the screen instructions.
Analog resistive film display
Projected capacitive display
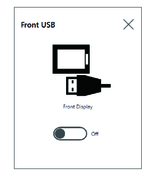
Front USB
Enables/disables the front USB port on the Display Module.
Default: Off (Disable)
-
If the front USB is enabled, the risk of unauthorized access and infection of malicious software increases. Disable the front USB after use.
-
In models without a front USB port, this setting is disabled.
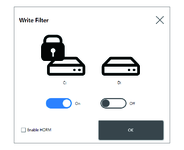
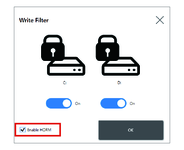
Write Filter
This function prevents writing to the system disk.
By enabling the Write Filter, you can prevent damage to the system disk and shortened life of disk due to excessive writes. Also, enabling the Write Filter allows you to turn off the power to this product without shutting it down. However, the write operation can occur right after restarting the product, even if the Write Filter is enabled, due to a characteristic of Windows®. Do not turn off this product right after restarting it.
Default: Off (Disable)
-
When only one volume is set to the Write Filter, the screen displays just that one volume.
-
When changing settings (such as settings in the Launcher, RAID, and when adding drivers, changing the registry, or installing applications), disable the Write Filter. If the Write Filter is enabled, any changes to settings will be erased when the operating system is restarted. After changes to settings are complete, we recommend that you re-enable the Write Filter.
-
If the Write Filter is enabled, the fast startup function is disabled.
 CAUTION CAUTION
|
|---|
|
EQUIPMENT DAMAGE
Regardless of the Write Filter setting, do not turn off the power immediately
after turning on the product.
Failure to follow these instructions can result in injury or equipment damage.
|
| NOTICE |
|---|
|
LOSS OF DATA
Do not turn off the power while writing
to a storage device that is not protected by the Write Filter.
Failure to follow these instructions can result in equipment damage.
|
HORM
This feature shortens the product’s start time.
If you save a system state with HORM enabled, it is possible to restore the system to this saved state even after power to this product is turned off. If HORM is enabled, you need to enable the Write Filter as well. By doing so, you can turn off the power to this product without performing a shutdown.
-
Before setting up HORM, enable the Write Filter on all volumes.
-
Removable disks are not supported for use with HORM. Before setting up HORM, detach all removable disks.
-
When HORM is enabled, the LED on the Display Module turns orange right away, but turn off the power only after confirming the power LED on the Box Module has turned red.
-
When HORM is enabled or immediately after hibernation, system backup or recovery will not run properly. Perform system backup or recovery after first disabling HORM and then shutting down the product.
-
If a system configured at hibernation or with HORM enabled is stored on a system disk, do not use that system disk on a different Box Module unit.
| CAUTION
|
|---|
|
EQUIPMENT DAMAGE
Regardless of the Write Filter setting, do not turn off the power immediately
after turning on the product.
Failure to follow these instructions can result in injury or equipment damage.
|
| NOTICE |
|---|
|
LOSS OF DATA
Do not turn off the power while writing
to a storage device that is not protected by the Write Filter.
Failure to follow these instructions can result in equipment damage.
|
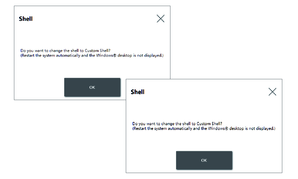
Shell
You can hide the Windows® desktop by switching from the Explorer Shell to the Custom Shell. By doing so, you can suppress Windows® functions such as the Control Panel.
Custom Shell: The Windows® desktop is not
displayed.
Explorer Shell: The Windows® desktop is displayed.
-
Install applications in the Explorer Shell.
-
When the Launcher is displayed, the features shown in the Explorer Shell (such as Windows® desktop, Start menu, taskbar) cannot be used.
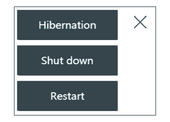
Power
When in the Custom Shell, use this feature to operate the product’s power supply .
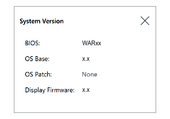
System
Displays the version of the product firmware, BIOS, and operating system.
Touch Mode
The following three modes are available to support your usage environment. Select the mode according to your usage environment.
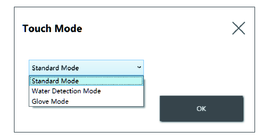
| Standard Mode | Factory default. Suitable for touch operations using your finger. |
| Water Detection Mode | Mode where touch input becomes disabled when there are liquids, such as drops of water, on the screen. Suitable to prevent touch panel mis-operation due to liquids on the screen. After wiping the liquid or other foreign substance from the screen, touch input becomes enabled in about 2 seconds. |
| Glove Mode | Mode suitable for use with gloves, such as rubber gloves.
NOTE:
|
System Monitor
This icon displays the system monitor. For information, refer to System Monitor.
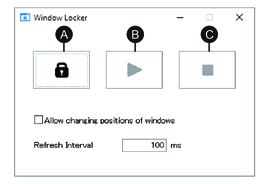
Window Locker
If for some reason the connection to the external display is disconnected, the displayed application window may move to a different position or to a different display altogether. By using the Window Locker, when applications start up you can display them in a fixed position, so that after reconnecting external displays you can view the application window in the same display and position as before being disconnected.
-
LOCK
-
PLAY
-
STOP
- Start up all application windows to define their display
positions and which display to use.NOTE: If you save the display position while the application is in full screen mode, the window may not display properly.
- Move each window to the desired display position.
- Run Window Locker from the Launcher.
- Select LOCK to save
the display position.NOTE:
-
Window sizes are fixed to the size when LOCK is pressed.
-
By entering an amount of time in the Refresh Interval, if you change the window size or position after PLAY is pressed, the window will return to its original size and position when the time elapses. If you select the Allow changing positions of windows check box, after PLAY is pressed, even when the entered time elapses the window will remain in the changed position, but the window will return to its original size.
-
The Refresh Interval input range is from 100 ms to 86,400,000 ms (24 hours).
-
- Select PLAY. Every time the application window opens, it automatically appears in the saved position.
-
When saving window positions, ensure that the Write Filter is disabled. If the Write Filter is enabled, the saved information will be erased when the operating system is restarted. After you finish saving, we recommend that you re-enable the Write Filter.
-
To temporarily release the fixed position, select STOP. To return to the fixed position, select PLAY.
-
After saving the window display position, connecting or disconnecting an external display loses the display positions. If you add a connection or disconnect, save the display position again. However, if you return to the same configuration as before connecting or disconnecting the external display, the saved display position information is applied so you do not have to set the display information again.
-
You may not be able to normally save the display position of windows with the same name, or applications such as Windows® Media Player, which have multiple internal windows.
-
After saving the window display position with Window Locker, changing the screen placement or resolution could cause the window to display incorrectly. If you change the screen settings, save the window display position again.
Edit
You can use this function to customize the icons displayed on the Launcher. You can also add any application to the display.
-
You can change the name of the icon.
-
You can change the application displayed. Click to display a screen where you can select the application’s exe file. Select the exe file of the application you want to display.
-
Click this mark to remove the icon.
-
Add the application displayed. Click to display a screen where you can select the application’s exe file. Select the exe file of the application you want to display.
-
Returns the icon display to the factory default settings.
-
This button releases Edit mode.