
Installation Procedure
This section describes how to install this product to the panel.
 DANGER DANGER
|
|---|
|
HAZARD OF ELECTRIC SHOCK, EXPLOSION,
OR ARC FLASH
Failure to follow these instructions will result in death or serious injury.
|
| NOTICE |
|---|
|
EQUIPMENT DAMAGE
Failure to follow these instructions can result in equipment damage.
|
- Place this product on a clean and level surface with the screen facing down.
- Check that the gasket is seated securely into the bezel
groove, which runs around the perimeter of the display panel frame.NOTE: Always use the installation gasket, since it absorbs vibration in addition to repelling water. For the procedure on replacing the installation gasket, refer to Replacing the Installation Gasket.
- Based on this product's Panel Cut Dimensions, open a mount-hole on the panel.NOTE: This product has a hook on the top to prevent falling during installation. Insert this product into the panel at an angle to avoid hitting the hook.

-
Hook
-
- Insert the installation fasteners into the panel‘s
insertion slots of this product.
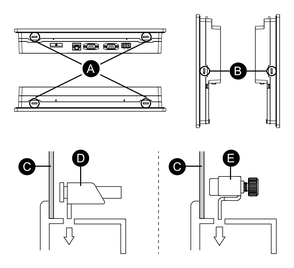
-
Insertion slots
-
Insertion slots (except for the ET-6400WA)
-
Panel
-
Installation fastener for ET-6400WA, ET-6500WA and ET-6600WA
-
Installation fastener for ET-6700WA
The number of installation fasteners for each model is as follows.
ET-6400WA Top - 2, Bottom - 2 ET-6500WA, ET-6600WA and ET-6700WA Top - 2, Bottom - 2, Left - 1, Right - 1 -
- Tighten the installation fastener’s screws with
a screwdriver.NOTE:
-
The necessary torque is 0.5 N•m (4.4 lb-in).
-
The installation fasteners for ET-6700WA can be screwed by hand too.
-
If the fasteners are not correctly attached, the panel may shift or fall out.

-
Screwdriver
-