M.2 SSD Installation
The following describes how to install the M.2 SSD card. The size of the M.2 SSD card conforms to Type 2242. M.2 SSD becomes Disk 0.
When installing the M.2 SSD, the optional M.2 cooling kit is required. Purchase and install using the following steps.
M.2 cooling kit for Advanced Box: PFXYP6HSM2A*1
M.2 cooling kit for Standard Box: PFXYP6HSM2S
*1 If you use the Advanced Box with the FAN kit, the M.2
cooling kit is unnecessary.
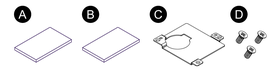
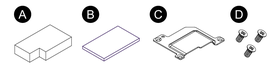
M.2 Cooling Kit Package Contents
For Advanced Box:
For Standard Box:
-
Heat sink pad (for bottom)
-
Heat sink pad (for top)
-
Heat sink
-
Screws for heat sink
 DANGER DANGER |
|---|
|
HAZARD OF ELECTRIC SHOCK, EXPLOSION,
OR ARC FLASH
Failure to follow these instructions will result in death or serious injury.
|
 CAUTION CAUTION |
|---|
|
STORAGE DEVICE DAMAGE
AND DATA LOSS
Failure to follow these instructions can result in injury or equipment damage.
|
| NOTICE |
|---|
|
ELECTROSTATIC
DISCHARGE
Take the necessary protective measures
against electrostatic discharge before attempting to remove the cover.
Failure to follow these instructions can result in equipment damage.
|
| NOTICE |
|---|
|
BROKEN ENCLOSURE
Do not exert more torque than the amount specified.
Failure to follow these instructions can result in equipment damage.
|
- Disconnect the power supply from the Box Module.
- Touch the housing or ground connection (not the power supply) to discharge any electrostatic charge from your body.
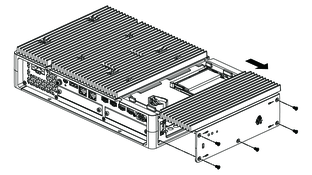
- Remove 5 screws of the maintenance hatch cover and slide
the cover to remove.
- Peel off the protective film from the underside of the
bottom heat sink pad, and place in the M.2 SSD card installation area. Also peel off
the protective
film from the top surface of the heat sink pad. When using the Advanced
Box with the FAN kit, this step is unnecessary.

-
Advanced Box
-
Standard Box
-
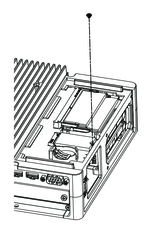
- Remove the screw from the M.2 SSD card installation area on the product.NOTE: Using a Phillips screwdriver #1 is recommended.

-
Advanced Box
-
Standard Box
-
- As shown below, insert the M.2 SSD card diagonally, then push from above.

- Secure the M.2 SSD card with the screw removed in step 5.NOTE:
-
Using a Phillips screwdriver #1 is recommended.
-
The necessary torque is 0.2 N•m (1.77 lb-in).
-
- Peel off the protective film from the underside of the
upper heat sink pad, and place the heat sink pad on the M.2 SSD card. Also peel off
the protective
film from the top surface of the heat sink pad. When using the Advanced
Box with the FAN kit, this step is unnecessary.

- Put in the heat sink, and attach with screws.
When using the Advanced Box with the FAN kit, this step is unnecessary. - Replace the maintenance hatch cover and tighten the screws.