![]()
-
Do not use the factory-set IP address when a private address*1 is used on the same network. A network communication error may occur.
*1 192.***.***.*** for the SP5000 Series (excluding Open Box) and GP-4G01. 10.***.***.*** for other models.
When using models other than the IPC Series or SP5000 Series Open Box, you can transfer the project file with the factory default IP address.
![]()
Do not use the factory-set IP address when a private address*1 is used on the same network. A network communication error may occur.
*1 192.***.***.*** for the SP5000 Series (excluding Open Box) and GP-4G01. 10.***.***.*** for other models.
![]()
Please refer to the Settings Guide for details.
![]() 34.12 Settings Guide
34.12 Settings Guide
If transfer is not successful even though the steps are followed, refer to the following.
![]() Maintenance/Troubleshooting Guide, T.2.4 Unable to transfer project (Ethernet cable)
Maintenance/Troubleshooting Guide, T.2.4 Unable to transfer project (Ethernet cable)
Transfer Preparation
Modify the PC's IP address and subnet mask as follows.
|
IP Address |
Subnet Mask |
|
|
When transferring to the SP5000 Series (excluding Open Box), ET6000 Series, ST6000 Series, STM6000 Series or STC6000 Series |
LAN1: 192.168.1.*** (Replace *** with value 1 to 254, except 100) LAN2: 192.168.2.*** (Replace *** with value 1 to 254, except 100) |
255.255.255.0 |
|
When transferring to GP-4G01, GPH6000 Series |
192.168.1.*** (Replace *** with value 1 to 254, except 100) |
255.255.255.0 |
|
When transferring to GP6000 Series |
192.168.1.*** (Replace *** with value 1 to 254, except 80) |
255.255.255.0 |
|
When transferring to other models |
10.255.255.*** (Replace *** with value 1 to 254)
|
255.0.0.0 |
![]()
You may have to restart the PC before the settings take effect.
Transferring
Connect the LAN cable to the display unit to establish the network with the PC installed with GP-Pro EX.
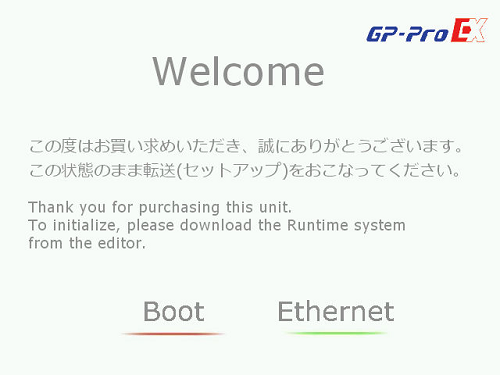
Turn ON the display unit. The [Initial Start Mode] screen appears. (When using the GP4000 Series, LT4000 Series, SP5000 Series, ET6000 Series, ST6000 Series, STM6000 Series or STC6000 Series, the [Welcome] screen appears.) On the [Initial Start Mode] or [Welcome] screen, touch [Agree].
![]()
If [Agree] does not display, proceed to the next step.
When using GP6000 Series or GPH6000 Series and the first time you turn on the display unit after purchase, the corresponding model’s initial setting screen displays. Set up the display unit while referring to the corresponding hardware manual. [Welcome] screen displays after setting up.
The [Initial Start Mode] or [Welcome] screen appears. Ethernet settings do not need to be set.
![]()
The [Initial Start Mode] screen or the [Welcome] screen is the first screen that appears after turning on the display unit immediately after purchase. After transferring a project once, this screen will not appear.
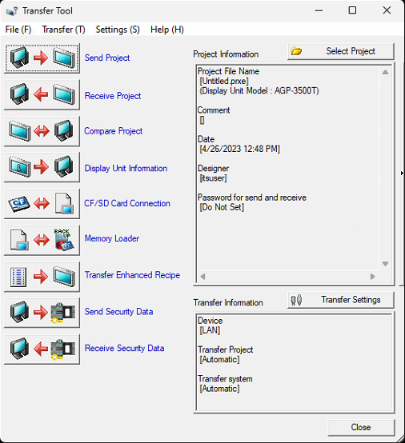
On the GP-Pro EX status bar, click the Transfer Project icon ![]() and launch the Transfer Tool.
and launch the Transfer Tool.
![]()
When the edited project has not been saved, a dialog box displays to confirm the save operation. Click [Yes] to save.
![]() 34.14.1 How Send Works
34.14.1 How Send Works
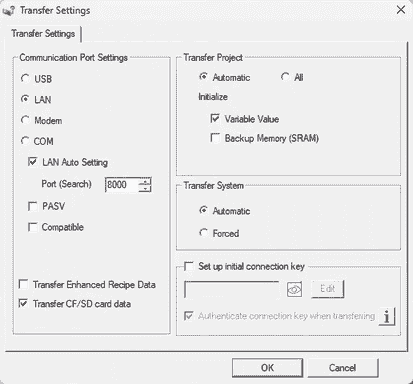
Click the [Transfer Settings] button. The following dialog box appears. Ensure that [Communication Port Settings] is set to [LAN]. Select the [LAN Auto Setting] check box and click [OK].
![]()
You can also open the same dialog box from GP-Pro EX's [Project (F)] menu by selecting [Transfer Project (G)] and then [Transfer Settings (C)].
When automatic detection is not working, selecting [PASV] sometimes makes detection work.
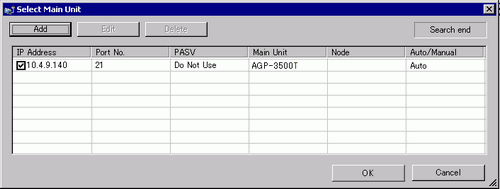
Click [Send Project]. The [Select Display Unit] dialog box displays the IP addresses of the display units.
Select the corresponding IP address check box and click [OK]. When multiple IP Address check boxes are selected, the project is sent to multiple display units.
![]()
If the display unit's IP address and subnet mask have changed, data can not be retrieved.
Ensure that you update these items in the PC settings.
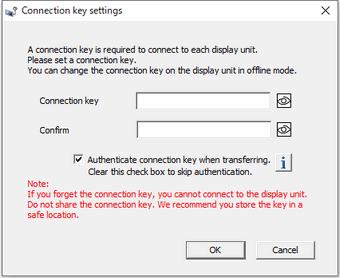
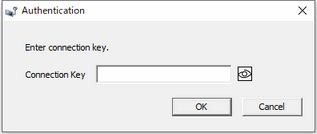
Set the connection key and click [OK]. Click the icon ![]() to show the key.
to show the key.
![]()
If you forget the connection key, you will not be able to connect to the display unit.
![]() 34.14.4 How the Connection Key Works
34.14.4 How the Connection Key Works
![]()
The [Connection key settings] dialog box appears only on the first transfer. The first time you transfer, you need to set the connection key.
The [Authentication] dialog box appears for transfers from the second time onward. This will not appear if during set up of the connection key you clear the [Authenticate connection key when transferring] check box in the [Connection key settings] dialog box.
If you want to change the [Authenticate connection key when transferring] setting in the [Connection key settings] dialog box that appears on the first transfer, edit the setting offline.
![]() M.17.4.3 Security Settings - Connection Key
M.17.4.3 Security Settings - Connection Key
The transfer begins.
The following dialog box appears during transfer to check the communication status.
(The display unit changes to Transferring mode and communication with the device/PLC is suspended.)

When transfer is completed, the state of the dialog box changes from [Transferring] to [Transfer Complete].
Click [Close].
(The display unit is reset and the transferred project screen is displayed.)
Click [Close] to return to the Transfer Tool. Click [Close] again to close the Transfer Tool.