■The minimum size of a touch switch. |
|
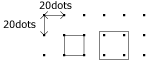
| The main part of a touch panel, the resistance film on a screen consists of grids of 20x20 dots, and a touch cannot be easily registered with a switch of 20x20 or smaller. The interval of 20×20 serves as the minimum size for touch-panel switch creation. |
|
|
| |
| Notes |
| However, the interval of 40×40 dots serves as the minimum unit at the time of touch-panel switch creation. |
|
|
|
■For checking the 20x20 grid using illustrating software. |
| |
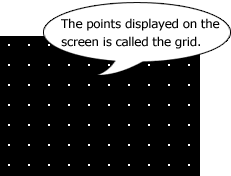
| The grid of the resistance film of 20x20 dots can be displayed in the editor software. This is called a "grid". It is convenient if you display the grid when drawing switches, parts or during T tag setup. |
| |
 |
| ■Various grid functions |
| ・ |
Change intervals. |
| ・ |
Change color can also be performed. |
| ・ |
[Snap] function to illustrate on grid. |
|
|
|
|
■Point at illustrating! |
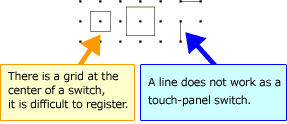
| |
| During screen creation, a pictures can be drawn that connect to the grid. Touches at the center of a touch-panel grid are hard to register. Be careful of placement at the time of touch-panel switch creation. |
|
|
|
| |
Correct positioning.
|
 |
|
Incorrect positioning.
|
 |
|
|
|
| |
| Introduction of a convenient function |
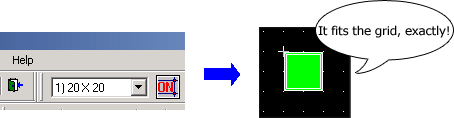
| ■About Snap function |
| |
When a [snap] function is turned ON, the images snap to the grid. |
| |
|
| |
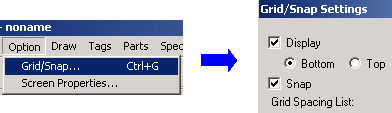
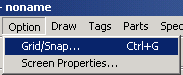
If you wish to have the snap function enabled by default, select [Option] -> [grid/snap], check [snap]. |
| |
|
|
|
|
■For changing the grid interval displayed in editor software. |
| |
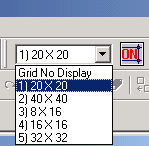
| In the screen editor, [20x20] can be changed into the following six patterns. |
|
Additionally, the items from 1 to 5 displayed on this pull down menu can be changed to your preferred settings.
|
| <To Change Options > |
| 1. |
Select [Option] -> [grid/snap] from the menu. |
| |
 |
|
| 2. |
When [grid / snap setup] opens, select 1 to 5 and chose settings for [interval], and click [change]. |
| |
 |
|
|
|