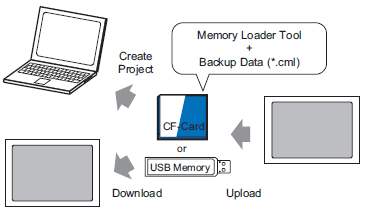
Backup (upload) the project on the display unit to a CF card or USB storage. The backup data (*.cml) can be converted into a project file (*.prx) and edited on a PC. You can also download and display the backup data on a different display unit.
![]()
You need to format (initialize) the CF Card and USB storage device in FAT.
You can initialize the CF Card in the display unit. For details, refer to the following.![]() Maintenance/Troubleshooting Guide, M.6 Initialization of the memory/CF card
Maintenance/Troubleshooting Guide, M.6 Initialization of the memory/CF card
![]()
Please refer to the Settings Guide for details.![]() 33.11.2 Memory Loader
33.11.2 Memory Loader
Transferring Project Files from Display Unit to Computer (or to Another Display Unit)
The following shows the process for using a CF Card. To use USB Storage, replace "CF Card" with "USB storage" in the process.
On the GP-Pro EX state tool bar, click the Transfer Project icon ![]() . The [Transfer Tool] dialog appears.
. The [Transfer Tool] dialog appears.
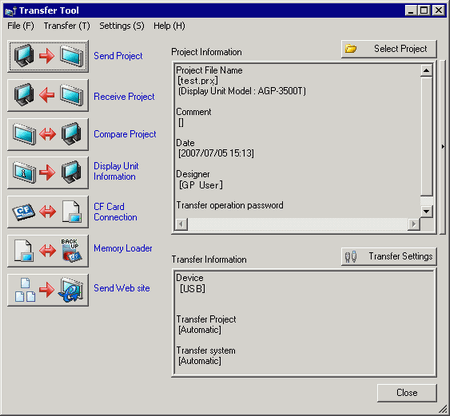
In [Select project], select the project you wish to transfer.
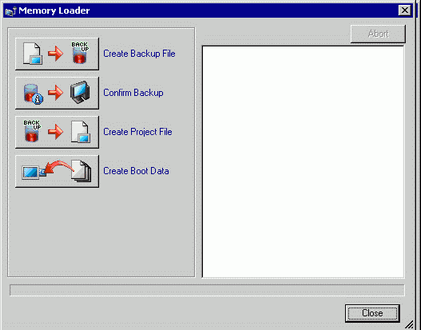
Click [Memory Loader] to open the following dialog box. Click [Create Boot Data].
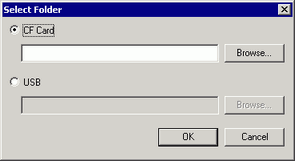
Select [CF Card] and click [Browse].
![]()
When [CF Card Folder] is being used as a temporary place to store the project, the [Select Folder] dialog box displays the destination folder path.![]() 5.7.2 Procedure - Viewing Project Information / Destination Folder Settings
5.7.2 Procedure - Viewing Project Information / Destination Folder Settings
In the [Browse folder] dialog box, specify the CF card's root folder and click [OK].
In the [Select Folder] dialog box, click [OK] to start creating data.
While creating data, the following dialog box appears to show the creation status.
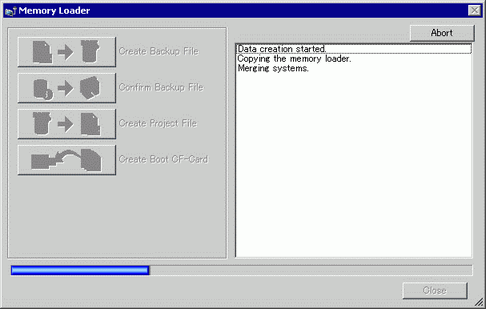
After data creation is complete, click [Close]. The created data is saved in the CF Card..
![]()
When [CF Card Folder] is being used as a temporary place to store the project, data is output to the defined path. Copy all data in the [CF Card Folder] to the CF card's root folder.
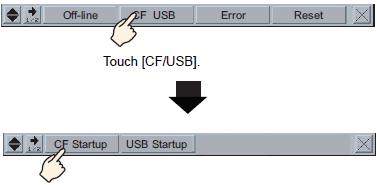
Insert the CF card to the display unit. To display the system menu, within 0.5 seconds of each touch, touch the top-right then the bottom-left corner, or touch the top-left then bottom-right corner.
[CF/USB]. Touch it. [CF startup] is touched to reset the display unit.
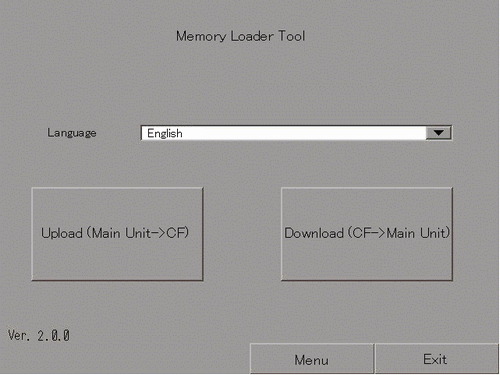
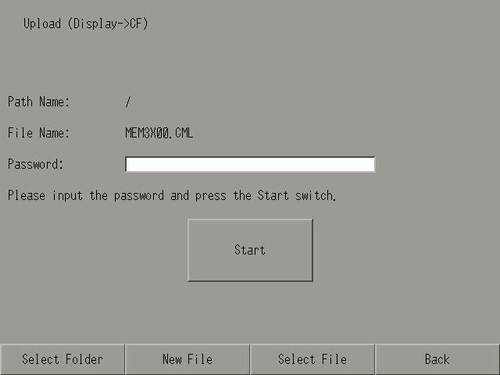
The Memory Loader Tool launches. The following screen opens.[Upload]. Touch it.
[Start] is touched to begin saving the project as backup data (*.cml). (If there is a password for transferring, input the password first, then touch [Start].)
![]()
Backup data is saved as displayed in the [File Name] field. If you are using AGP-3500T, by default this is "MEM3X00.CML." If you want to use another file name, touch [New File]. To overwrite an existing file name in the CF Card, touch [Select File].
When using GP-4100 series, the password input keypad is separated into alphabetic input and numeric input keypads. Use the [A→1] and [1→A] keys to change keypads.
The input character changes every time you touch a key on the alphabetic keypad.
Once upload is complete, touch [Back] then [Exit] to close the Memory Loader Tool.
Remove the CF Card from the display unit and insert it into the PC.
On the GP-Pro EX state tool bar, click the Transfer Project icon ![]() . The [Transfer Tool] dialog appears.
. The [Transfer Tool] dialog appears.
Click [Memory Loader]. The following dialog box appears.
Click [Create Project].
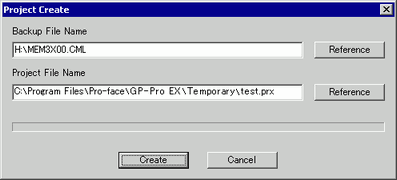
In the following dialog box, select the CF Card in the [Look In] field. Select the backup file (*.cml) to convert to a project file (*.prx) and click [Open].

Enter the name and the location of the project file you are going to create and click [Save].
Confirm the information in the [Project Create] dialog box, and then click [Create].
![]()
Click [Browse] to edit the settings of the backup file or the project file.
The following dialog box appears.
When the message "Data Creation Ended" appears, click [Close].