A: Preload input or trigger bit for #L_ExIOCntInCtrl system variable's write operation
PLV: Preload Value
Preload is a function for writing the high-speed counter's current value with the defined value. The write operation uses input signals (preload input) from external terminals or the #L_ExIOCntInExtCtrl system variable.
|
|
A: Preload input or trigger bit for #L_ExIOCntInCtrl system variable's write operation PLV: Preload Value |
Summary
In GP-Pro EX, you can set up the initial preload value. When the system is running, you can change the preload value with system variables or the HSCX logic instruction. The following describes the steps when using a system variable.
The following explains how to set up Preload (Change Value) and explains its operation after the system is running.
Setting Up Initial Values
Refer to "Setup Process in GP-Pro EX".
Writing to the preload value
Write to preload value with external input or #L_ExIOCntInCtrl system variable.
Check the result of the write operation.
Changing setup value after system is running
Set the preload value in the system variable #L_HSC*_PLV
Set the #L_ExIOSpParmChg system variable's [Request Special I/O Parameter change] parameter
Check that the parameter has changed using the system variable's (#L_ExIOSpParmChg) special I/O parameter change completed flag.

The [Request Special I/O Parameter Change] and [Special I/O Parameter Change Completed] operations, described later, reflect all the CH parameters you change.
Right after transferring, operations use parameter values set up in GP-Pro EX. Any restarts, which include going off-line, reset, and turning power OFF, use stored system variables as parameters.
Set Up Process in GP-Pro EX
LT3000 Series / STC6000 Series
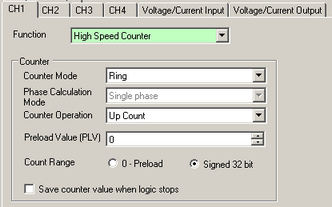
From the [Project] menu, point to [System Settings] and click [I/O Driver]. On the [Int.Driver 1] tab, select [High Speed Counter Settings].

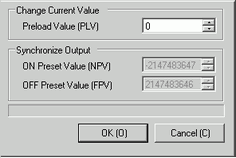
Click [High Speed Counter Settings] and set the [Preload Value (PLV)] in the dialog box that appears.
![]()
To write to the preload value with signals from input terminals, in the CH set up with the [High Speed Counter] select [Preload] and enable preload input.
LT4000 Series
From the [Project] menu, point to [System Settings] and click [I/O Driver]. Select [High Speed Counter] in [Function].
In [Preload Value (PLV)] specify the preload value.
![]()
When writing to the preload value with signals from input terminals, select the [Extended Input] check box and select [Preload] to enable preload input.
Writing to the preload value
To write the high speed counter value to the preload value, you can use either input terminal signals or system variable (#L_ExIOCntInCtrl).
Write using terminal input signal
Write to the preload value by turning the input terminal signal, defined in the [I/O Driver] dialog box, ON or OFF.
![]()
For the LT3000 series and STC6000 series, the [Edge Settings] property is unavailable. As a result, the write operation occurs on the input signal's rising edge only.
|
|
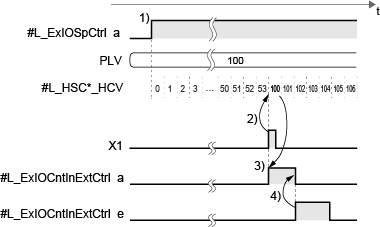
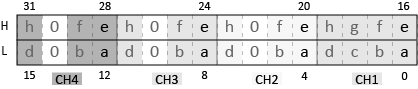
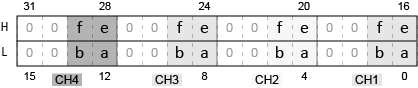
#L_ExIOSpCtrl a: High Speed Counter Control Bit PLV: Preload Value #L_HSC*_HCV: Current Counter Value X1: External input (preload input signal)
#L_ExIOCntInExtCtrl |
1) Turn ON the high speed counter control bit (a) in the #L_ExIOSpCtrl system variable to start the counter.
2) When preload input (X1) turns ON, preload value (100) is written to the counter value (#L_HSC*HCV).
3) When the write operation is completed, the preload operation complete bit (a) in the #L_ExIOCntInExtCtrl system variable turns ON.
4) Turning ON the preload completion acknowledged bit (e) in the #L_ExIOCntInExtCtrl system variable causes the preload operation complete bit (a) to turn OFF. The preload operation complete bit (e) does not turn OFF automatically.
Counter External Input Control (#L_ExIOCntInExtCtrl)
System variable to control and check the status of the extended input (preload/prestrobe/marker) for high-speed counter and 2-phase counter.
![]()
On the LT4000 series, to activate the extended input function (external input), turn ON the allow extended input bit (d) in #L_ExIOCntInExtCtrl for each CH.
![]() 31.5.1.3 Special I/O System Variables
31.5.1.3 Special I/O System Variables
|
|
Bit Number |
Feature |
Type |
Description |
Display Unit |
|
|
LT4000 |
LT3000/STC6000 |
|||||
|
a |
4(n-1)+0 |
Preload operation complete |
Status |
Turns ON when you use the preload input as the trigger and write the preload value to the current value. This bit turns OFF when you turn ON the preload completion acknowledged bit (e). |
|
|
|
e |
4(n-1)+16 |
Preload completion acknowledged |
Control Up |
Confirm the preload operation complete bit (a) is ON, and then turn ON this bit. |
|
|
* To find the bit number associated with each CH, calculate by replacing "n" with the CH number.
Write using system variables
Turn ON the preload request bit ON in the #L_ExIOCntInCtrl system variable to write to the preload value.
|
|
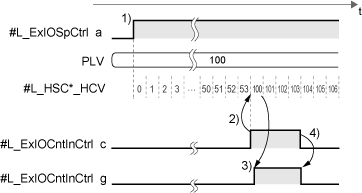
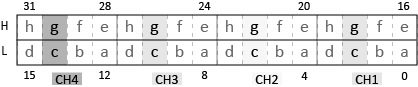
#L_ExIOSpCtrl a: High Speed Counter Control Bit PLV: Preload Value #L_HSC*_HCV: Current Counter Value
#L_ExIOCntInCtrl |
1) Turn ON the high speed counter control bit (a) in the #L_ExIOSpCtrl system variable to start the counter.
2) When the preload request bit (c) in the #L_ExIOCntInCtrl system variable turns ON, the preload value (100) is written to the current counter value (#L_HSC*HCV).
3) When the write operation is completed, the preload operation complete bit (g) in the #L_ExIOCntInCtrl system variable turns ON.
4) After confirming the write operation is complete, turning OFF the preload request bit (c) in the #L_ExIOCntInCtrl system variable causes the preload operation complete bit (g) to also turn OFF.
Counter Input Control (#L_ExIOCntInCtrl)
System variable for running and confirming high-speed counter operations. The bits that are used differ depending on the CH mapped to the high-speed counter.
|
|
Bit Number |
Feature |
Type |
Description |
Display Unit |
|
|
LT4000 |
LT3000/STC6000 |
|||||
|
c |
4(n-1)+2 |
Write to preload value |
Control Up |
Writes the preload value to the high-speed counter's current value. This bit turns OFF when you turn ON the write completion acknowledged bit (e). |
|
|
|
g |
4(n-1)+19 |
Write complete acknowledged |
Status |
When using write to preload value bit (c) as the trigger, this bit turns ON when write operation is complete. |
|
|
* To find the bit number associated with each CH, calculate by replacing "n" with the CH number.
Changing the preload value after the system is running
To change the preload value from the display unit, write the preload value to the #L_HSC*_PLV system variable, and use #L_ExIOSpParmChg to change the parameter.
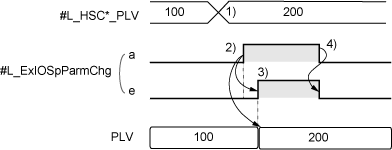
1) Write the preload value (200) to the system variable #L_HSC*_PLV.
2) Turn ON the request special I/O parameter change bit (a) in the system variable #L_ExIOSpParmChg to write to Special I/O's preload value (PLV).
3) After overwriting the special I/O parameter, the special I/O parameter change completed bit (e) in the system variable #L_ExIOSpParmChg turns ON.
4) After confirming the write is complete, the request special I/O parameter change bit (a) turns OFF. Once the request special I/O parameter change bit turns OFF, the special I/O parameter change completed bit (e) also turns OFF.
Request Special I/O Parameter Change (#L_ExIOSpParmChg)
|
|
Bit Number |
Feature |
Type |
Description |
Display Unit |
|
|
LT4000 |
LT3000/STC6000 |
|||||
|
a |
4(n-1)+0 |
Request special I/O parameter change |
Control Up |
Rewrites the special I/O value. Writes the value set up in the system variable to the special I/O parameter. |
|
|
|
b |
4(n-1)+1 |
Special I/O parameter read request |
Control Up |
Reads the special I/O parameter value to the system variable. |
|
|
|
e |
4(n-1)+16 |
Special I/O parameter change completed |
Status |
Turns ON after the parameter change associated with bit (a) is complete. Turning OFF bit (a) also turns this bit OFF. |
|
|
|
g |
4(n-1)+17 |
Special I/O parameter read complete |
Status |
Turns ON after the parameter read associated with bit (b) is complete. Turning OFF bit (b) also turns this bit OFF. |
|
|
* To find the bit number associated with each CH, calculate by replacing "n" with the CH number.