![]()
-
Please refer to the Settings Guide for details.
 13.8 Lamp Settings Guide
-
For details on how to draw parts, and defining the address, shape, color, and labels, please see the following.
8.7.1 Editing Parts
![]()
Please refer to the Settings Guide for details.
![]() 13.8 Lamp Settings Guide
13.8 Lamp Settings Guide
For details on how to draw parts, and defining the address, shape, color, and labels, please see the following.
![]() 8.7.1 Editing Parts
8.7.1 Editing Parts
You can change the color of a lamp based on the value of the word address.
Specify value ranges as conditions for changing lamp colors. You can specify up to 256 ranges, and define the lamp shape to display by setting [State] for each range. The range settings have priorities. When the specified ranges overlap, the [State] with higher priority is displayed.
The following example explains the steps to display a lamp with 3 colors (from State 0 to State 2) using the value of word address D100.
State 2 (priority 1) is when the word address value is 100 to 200, State 1 (priority 2) is when the value is plus or minus 50 from the State 2 range, and State 0 (out-of-range display) is when the value is out of these ranges. The lamp color is green for State 2, yellow for State 1 and red for State 0.

From the [Parts (P)] menu, point to [Switch Lamp (C)] and select [Lamp (L)] or click ![]() to place a lamp on the screen.
to place a lamp on the screen.
Double-click the placed lamp. The Switch/Lamp dialog box appears. Click [Extended].
Click [Word Address] and set the [Number of States] and [State Switch Condition].
(For example, [Number of States] = 3, [State Switch Condition] = Change state by ranges)
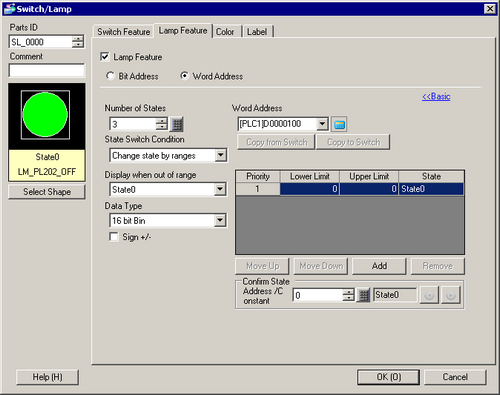
In [Word Address], set the address used for changing lamp colors, and set the type of data stored in the address in the [Data Type]. (for example: [Word Address]=D100, [Data Type]=16Bit Dec, [Sign +/-]=None)
Select a state for [Display when out of range]. The [State] specified here is displayed when the word address value does not match with any range settings. (For example: State 0)
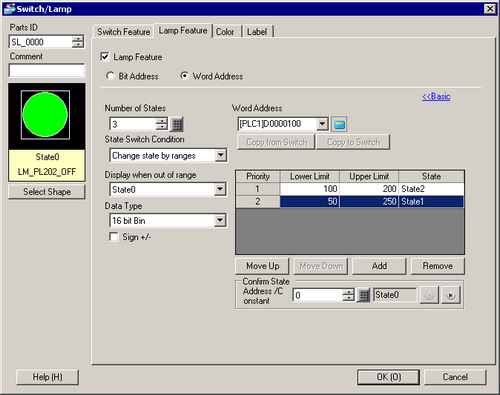
In the list of Range Settings, add rows as necessary and set [Lower Limit], [Upper Limit], and [State]. Every time [Add] is clicked, one row is added. When the word address value is higher than the [Lower Limit] and lower than the [Upper Limit] specified here, the lamp is displayed with the shape specified in the [State]. (For example: [Priority]1's [Lower limit] 100, [Upper limit] 200, [State] State2,[Priority]2's [Lower limit] 50, [Upper limit] 250, [State] State1)
![]()
When range settings are overlapping, the one with the higher priority is displayed. The [Priority] is higher when the number is smaller, and lower when the number is larger. Use [Move Up] and [Move Down] buttons to move between rows and set proper priorities.
In [Select Shape], select the lamp shape for each [State].
Click the [Color] tab. Select each state in [Select State] and specify [Display Color].
(for example: [State 0]: [Display Color]=red; [State 1]: [Display Color]=yellow; [State 2]: [Display Color]=green)
![]()
Depending on the shape, the color setup procedure may differ from the procedure described above. Click [Select Shape]. The [Select Shape] window appears. Select each state and click [Open] to select a shape and color.
Depending on the shape, you may not be able to change the color.
Click the [Label] tab and define the label for each state. Specify the font type and size, then type the text and click [OK].
![]()
When you select a lamp and press the [F2] key, you can directly edit the text on the label.