Select Shape
Open the Select Shape dialog box to choose the Part shape.
![]()
Depending on the shape, you may not be able to change the color.
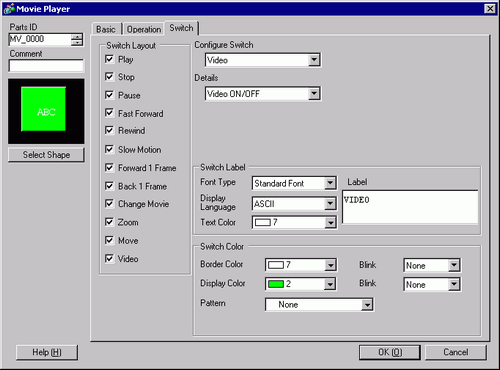
Switch Layout
Select the operation switch to be attached to Movie Player.
Play
Starts play.
Stop
Stops playback. The movie file will play from the beginning when played again. It cannot be played from the point where it was stopped.
Pause
Pauses play.
Fast Forward
Plays a movie in fast forward. This switch operates even in the stop state.
Rewind
Plays a movie while rewinding. This switch does not operate in the stopped state.
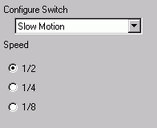
Slow Motion
Plays a movie in slow motion. This switch operates even in the stop state.
Forward 1 Frame
Forwards a movie frame by frame. This switch can be used only in the pause state.
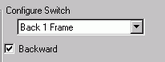
Back 1 Frame
Reverses a movie frame by frame. This switch can be used only in the pause state.
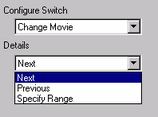
Change Movie
Stop the movie being played and play another movie. To specify a movie to be played, select [Next], [Previous] or [Specify Range].
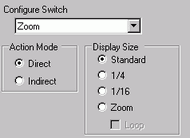
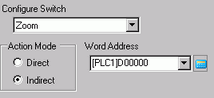
Zoom
Enlarges/reduces the movie display.
Move
Moves the movie display position.
Video
Switch the video camera picture being displayed.
Select Switch
From among the switches on the screen, select a switch for specifying the details and labels.
This item is displayed only when [Slow Motion] is selected in [Configure Switch]. Select the speed for slow motion from [1/2], [1/4] or [1/8].
This item is displayed only when [Forward 1 Frame] is selected in [Configure Switch]. Select the frame width.
Multiple Frames
Forward a movie by "I" frames.
Single Frame
Forward a movie by one frame.
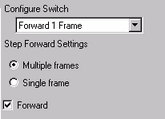
Forward
This item is displayed only when [Forward 1 Frame] is selected in [Configure Switch]. While pressing the switch, specify whether to continuously forward a movie frame by frame.
Backward
This item is displayed only when [Back 1 Frame] is selected in [Configure Switch]. While pressing the switch, specify whether to continuously reverse a movie frame by frame.
Detail Action
This item is displayed only when [Change Movie] is selected in [Configure Switch]. Select the operation for switching movies.
Next
Previous
Specify Range
This item is displayed only when [Change Movie] is selected in [Configure Switch], and [Next] or [Previous] is selected in [Details]. Specify whether to perform a loop operation.
Index Number
This item is displayed only when [Change Movie] is selected in [Configure Switch], and [Play List] is specified in [Details]. Specify the Index Number of the movie file to be played. The setting range is from 0 to 99.
Action Mode
This item is displayed only when [Zoom] is selected in [Configure Switch]. Select how to specify the display size from either [Direct] or [Indirect].
Direct
Select the display size from [Standard], [1/4], [1/16], or [Zoom]. For [Zoom], every time the switch is pressed, the movie is zoomed in the following steps.
Standard -> 1/4 -> 1/16 -> 1/4 -> Standard
![]()
When [Loop] is specified, the order is Standard -> 1/4 -> 1/16 -> Standard -> 1/4.
Indirect
Specify the address for storing the display size to indirectly zoom the movie.
The following lists the values to be stored.
0: Standard
1: 1/4
2: 1/16
3 to 0xFFFE: Reserved (does not change)
0xFFFF: Returns to the original screen size.
If a value other than the above is stored, the movie will not zoom.
![]()
For a 32-bit device, only the bottom 16 bits are used.
Detail Action
This item is displayed only when [Move] is selected in [Configure Switch].
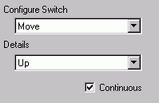
Direction
Select the direction to move the movie from [Up], [Down], [Left], or [Right]. The following describes the range in which a movie can be moved at one time.
|
Direction |
When playing a movie |
When playing a video |
|---|---|---|
|
Landscape direction |
2 dot unit |
2 dot unit |
|
Portrait direction |
Normal size: 2 pixel units 1/4, 1/16 size: 1 dot unit |
1 dot unit |
Continuous
While pressing the switch, specify whether to continuously move a movie.
Switch Label
Font Type
Select the font type for the label that displays on the switch.
Standard Font
The vertical and horizontal dimensions of a character can be specified in bitmap font. When a character is enlarged or reduced, the outline of the character may appear grainy or smudged.
Stroke Font
This is an outline font where the ratio of the character height/width is fixed. Even when a character is enlarged or reduced, the outline clearly displays. However, due to the large required capacity, this font may put a burden on the display unit.
Display Language
Select a language for the label on the switch from [Japanese], [ASCII], [Chinese (Traditional)], [Chinese (Simplified)], [Korean], [Cyrillic], or [Thai].
Text Color
Select a color for the label text.
Label
Enter the text to display on the switch.
Switch color
Border Color
If it exists, select a color for the Part Shape border.
Display Color
Select the Switch color.
Pattern
Select from the 8 patterns or choose [No Pattern].
Blink
Select the Part blink and blink speed. You can choose different blink settings for the [Border Color] and [Display Color].
![]()
There are cases where you can or cannot set Blink depending on the Display Unit and [Display] tab's [Display Settings] area.![]() 8.5.1 Setting Colors
8.5.1 Setting Colors
![]()
Depending on the shape, you may not be able to change the color.
When you select a switch and press the [F2] key, you can directly edit the text on the label.