![]()
Please refer to the Settings Guide for details.
 10.16 Selector List Parts Settings Guide
For details on how to draw parts, and defining the address, shape, color, and labels, please see the parts editing topic.
8.6.1 Editing Parts
![]()
Please refer to the Settings Guide for details.![]() 10.16 Selector List Parts Settings Guide
10.16 Selector List Parts Settings Guide
For details on how to draw parts, and defining the address, shape, color, and labels, please see the parts editing topic.![]() 8.6.1 Editing Parts
8.6.1 Editing Parts
Create a switch in which the bit operation inverts (ON/OFF) bit address M100, and changes the screen to the registered screen number.
![]()
The registered order does not affect the process. This is the order in which it is displayed in the list.
You can change the display order in the [Selector Function List].
From the [Parts (P)] menu, select [Selector List (E)] or click ![]() and place the part on the screen.
and place the part on the screen.
Double-click the placed selector list to open the setting dialog box.
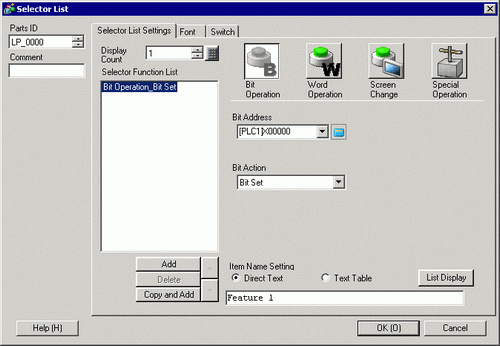
Create the switch to operate the bit.
Specify the [Bit Address] that you want to operate when the switch is touched.
In [Bit Action], select [Bit Reset] to complete the bit switch feature settings.
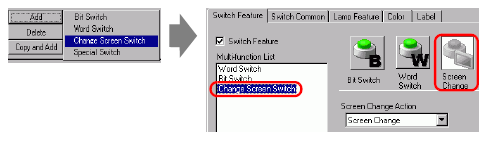
Click [Add] and select [Screen Change].
The dialog box will show the screen change settings, and [Screen Change] is added to the [Selector Function List].
![]()
In the selector function list, when you select and right-click the feature and select [Default (D)], the feature will be registered as a switch to be displayed on the top of the list. For the feature to display on the top of the list, it is useful to set the features frequently used as default, because the procedure to select from the list by touch operation is not necessary.
From the [Screen Change Action] drop-down list, select [Screen Change].
Enter the screen number of the screen to display in the [Screen Number]. The Change Screen feature settings are complete.
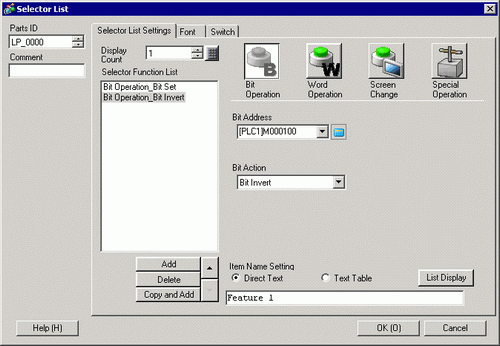
Select the registered feature in the [Selector Function List], click [Direct Text] in the [Item Name Settings] and enter an item name to be displayed on the list.
![]()
Open [Font Settings] to change the font type, size, or color of the item name you entered.
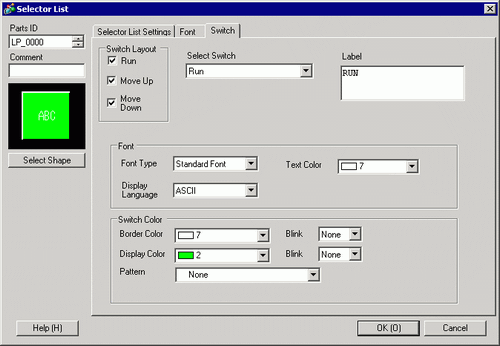
Open the [Switch] tab and select the [Run], [Move Upward], or [Move Downward] check boxes.
Select the required switch from the [Select Switch] list and define the switch's colors and text, then click [OK].
![]()
Depending on the shape, you may not be able to change the color.
When you select a switch and press the [F2] key, you can directly edit the text on the label.