![]()
Please refer to the Settings Guide for details.
 30.4.3 I/O Driver Settings Guide - FLEX NETWORK
![]()
Please refer to the Settings Guide for details.![]() 30.4.3 I/O Driver Settings Guide - FLEX NETWORK
30.4.3 I/O Driver Settings Guide - FLEX NETWORK
The following is an example of how to use digital I/O (DIO) in the FLEX NETWORK unit.
Select AGP-XXXXX-FN1M as the display unit. The FLEX NETWORK driver is automatically set up.
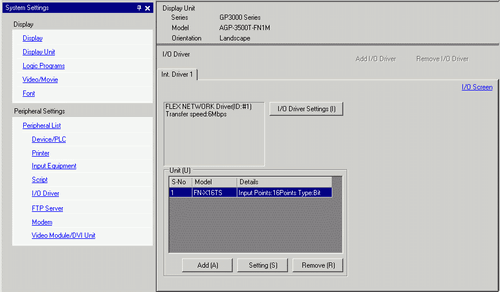
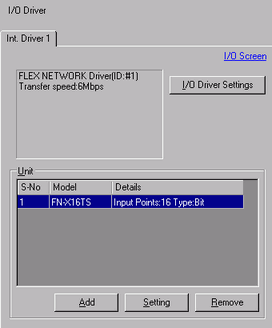
In the [System Settings] window, select [I/O Driver] to display the following screen.
![]()
If [System Settings] is not displayed in the workspace, on the [View (V)] menu, point to [Workspace (W)], and then click [System Settings (S)].
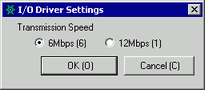
Click [I/O Driver Settings]. The following dialog box appears. In the dialog box that appears, select the Transmission Speed and click [OK].
In the I/O Driver window, select the I/O unit to be configured, and click [I/O Driver Setting].
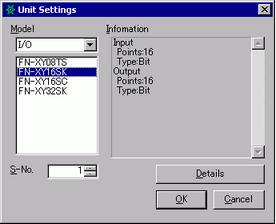
The [Unit Settings] dialog box appears. To change the type, in the [Model] area, select the model of I/O unit. (For example, [I/O] and "FN-XY16SK").
![]()
When using an analog unit, set the Type to [Analog]. When using positioning units or a high-speed counter, set the Type to [Special].
Specify the same number as the S-No. specified on the unit.
![]()
You can specify the S-No from 1 to 63. However, you cannot duplicate the same S-No in the same FLEX NETWORK.![]() 30.4 Using FLEX NETWORK External I/O
30.4 Using FLEX NETWORK External I/O
To define detailed settings in the I/O unit, click [Details], make your changes, and click [OK]. (The positioning unit does not have detail settings.)
In the [Unit Settings] dialog box, click [OK] to apply the changed settings.
To add I/O units, click [Add]. In the [Unit Settings] dialog box, follow the procedure similar to steps 5 to 7 to complete the setup. You can add different types of units.
After completing the device settings for the FLEX NETWORK, map the addresses to the I/O terminals. Click [I/O Screen] to set up I/O terminals.
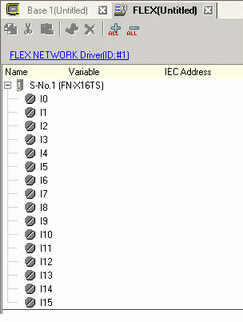
![]()
You can also display the I/O Screen from the [Screen List] window.
Map an address (variable) to each terminal. The following describes how to map addresses.
![]() 30.1.1 Mapping Addresses (Variables) to I/O Terminals
30.1.1 Mapping Addresses (Variables) to I/O Terminals