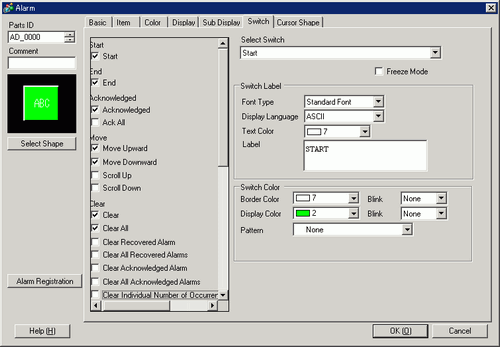
Select an operation switch to display an Alarm Message.

The same Switch as the one set on this tab can be created with a Switch Lamp Part [Special Switch] - [Alarm History Switch].
 10.15.4.1 Special Switch - Switch Features
If Visibility Animation is set, the set switch becomes invisible when the Alarm Part is changed to invisible.20.3 Showing and Hiding Objects
Switch Preview
Displays the selected switch shape.
Select Shape
Open Shape Browser to choose the Part shape.
Types of Switches
Set the Switch type.
Start/Exit
Set a switch to start/end operation.
Start/Exit
Touch [Start] and the cursor will appear to operate the other switches.
Touching [End] cancels the cursor.

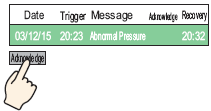
Acknowledge
Set up the Acknowledge switch.
Acknowledge
Acknowledges the alarm in the current cursor position. Press [Acknowledge] and the selected Alarm Message's acknowledge time is displayed.
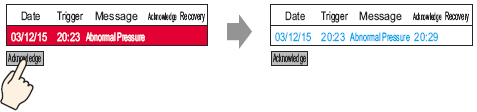
Alarms that have already recovered will not change when [Acknowledge] is touched.
If an Alarm Message is already displayed with the acknowledge time, the time will not be updated.
Acknowledge All
Acknowledges all Alarm Messages that are currently triggered.
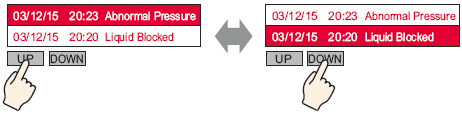
Move
Set the Move switches.
Move Up/Move Down
Moves the cursor 1 row up or down.
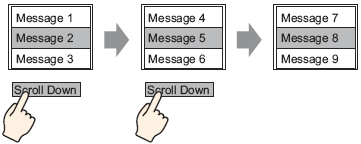
Scroll Up/Scroll Down
Alarm Messages that are currently displayed are scrolled up or down by a given number of rows.
For example, Number of Active Alarms: 9, Display Rows: 3, Scroll: 3
Clear
Set a switch to clear the display. The Bit or Word data of the host (PLC) will not be cleared.
Clear
Touch [Clear] to erase the Alarm Message display at the current cursor position.

Clear All
Erases all displayed Alarm Messages, regardless of whether they are in the [Trigger], [Acknowledged], or [Recovery] state.
Clear Recovery Alarm
Erases the recovered alarm message at the current cursor position. The message is not erased if it is not in the Recovery state.
Clear All Recovery Alarms
Erases all recovered Alarm Messages.
Clear Acknowledged Alarm
Erases the acknowledged alarm message at the current cursor position. The message is not erased if it is not in the Acknowledged state.
Clear All Acknowledged Alarms
Erases all Acknowledged Alarm Messages.
Clear Individual Number of Occurrences
Clears the Number of Occurrences for the alarm in the cursor's current position and replace that value with "0".
Clear All Number of Occurrences
Clears the Number of Occurrences for all displayed alarms and replace that value with "0".
Clear Individual Accumulated Time
Clears the accumulated time for the alarm in the cursor's current position and replace that value with "0".
Clear All Accumulated Time
Clears the accumulated time for all displayed alarms and replace that value with "0".
Sort
Set a switch to sort Alarm Messages.
This setting is disabled when the Display Mode is set to [Log].
Even when the display order of the messages changes on the screen, the Alarm History data is printed or saved to the CF Card in the order of occurrence.
In Reverse Order of Trigger Date
Displays Alarm Messages in the order of occurrence, according to the scroll direction.
In Number of Occurrences Order
Displays Alarm Messages in the order starting with the largest occurrence frequency, according to the scroll direction.
If multiple alarms with the same frequency exist, they will display in the decreasing order of the accumulated time, according to the scroll direction. If multiple alarms have the same number of occurrences and accumulated time, the newest alarm will display first.
In Descending Order of Accumulated Time
Displays Alarm Messages in the order starting with the largest accumulated time, according to the scroll direction.
If multiple alarms with the same accumulated time exist, they will display in the decreasing order of the number of occurrences, according to the scroll direction. If multiple alarms have the same number of occurrences and accumulated time, the newest alarm will display first.
Level & In Reverse Order of Trigger Date
Displays Alarm Messages in the order starting with the highest registered level, according to the scroll direction. If multiple Alarm Messages with the same level exist, messages will display in the order starting with the latest occurrence date.
Level & In Descending Order of Number of Occurrences
Displays Alarm Messages in the order starting with the highest registered level, according to the scroll direction. If multiple Alarm Messages with the same level exist, messages will display in the decreasing order of the alarm frequency, according to the scroll direction.
If multiple alarms with the same frequency exist, they will display in the decreasing order of the accumulated time.
Alarm Registration Order
Displays Alarm Messages in ascending order of the registration number (Row Number) set in [Alarm], according to the scroll direction.
Reverse Order
Displays Alarm Messages in the reverse order of the specified sorting order.
Scroll
Set the scroll switch used by the [Address] column.
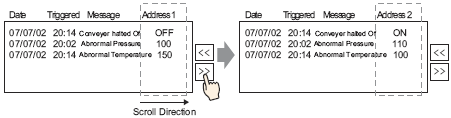
Scroll Right Value
Scrolls displayed data to the right.
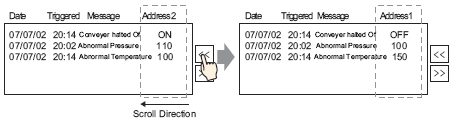
Scroll Left Value
Scrolls displayed data to the left.|
Sub Display
Set the Sub Display switch.
Sub Display
Displays the sub screen registered to the Alarm Message at the current cursor position.
Alarm Number Acquisition
Set the Alarm Number Acquisition switch.
Alarm Number Acquisition
Obtains the Alarm Message Number (the row number registered in [Alarm]) of the message at the current cursor position.
The retrieved alarm message number is stored in the location defined in the [Cursor Shape] tab's [Storage Word Address].
This function will not operate if [Extended] is selected under [Alarm Settings] - [Common Settings] - [Alarm Type].
Start Ladder Monitor
Sets up a switch to start ladder monitoring.
Start Ladder Monitor
If you purchased and installed the Ladder monitor, use the Ladder Monitor to search the step that uses the device address that corresponds to the selected alarm.
Select Switch
Choose a switch to set the label or scroll count.
Samples to Scroll
Set the number of rows to scroll up or down from 1 to 768 when you place the [Scroll Up]/[Scroll Down] switch.
Specify whether to use Freeze Mode when you place the [Start] switch. Freeze Mode suspends the currently displayed alarms and prohibits the screen display from refreshing. This can be used to temporarily stop the display when alarms are triggered too often to be seen.
When Freeze Mode is set, touch [Start] twice to begin freeze mode, and touch [End] to stop it.
When the following operations are performed in freeze mode, the management and display will be as follows.
|
Actions/Switch Operations |
Processing |
Display |
|
Alarm: Trigger, Recovery Switch Operation: [Acknowledge], [Clear] |
O |
X |
|
Switch Operation: [Move Upward], [Move Downward], [Scroll Up], [Scroll Down], [Sub Display] |
O |
X |
|
Switch Operation: [Alarm Number Acquisition Key] |
O |
- |
|
Switch Operation: [Sort] |
X |
X |
Note that executing a clear while Freeze Mode is activated will clear the messages stored inside the display unit, even though the messages remain on the display unit.
When the message stored in the GP has been cleared as mentioned above, the sub display is not displayed in the Freeze Mode.
The Freeze Mode remains activated even when the Alarm Part is changed to invisible in the Freeze Mode. Change the Alarm Part to visible to cancel the Freeze Mode.
Switch Label
Set the text to display on the switch label.
Font Type
Choose a font type for the switch label from [Standard Font] or [Stroke Font].
Display Language
Select a language for the label on the switch from [Japanese], [ASCII], [Chinese (Traditional)], [Chinese (Simplified)], [Korean], [Cyrillic], or [Thai].
Text Color
Select a color for the switch label.
Label
Input the text to display on the switch label.
When you select a switch and press the [F2] key, you can directly edit the text on the label.
Switch Color
Set the Switch color.
Border Color/Display Color
Designate the switch and background color.
The Switch Color setting is common to all Alarm parts, regardless of the switch type selected.
Blink
Select the blink and blink speed. You can choose different blink settings for the [Border Color], [Display Color], and [Pattern Color].
There are cases where you can or cannot set Blink depending on the Display Unit and [Display] tab's [Display Settings] area.8.5.1 Setting Colors
Pattern
Select the switch pattern from 9 types.
Pattern Color
Specify the pattern color when you select options other than [No Pattern].