
Replacing the Fan Filter
Introduction
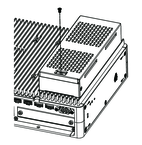
The following describes how to replace the fan filter in the FAN kit.
NOTE: Check the fan
filter regularly.
 DANGER DANGER |
|---|
|
HAZARD OF ELECTRIC SHOCK, EXPLOSION,
OR ARC FLASH
Failure to follow these instructions will result in death or serious injury.
|
| NOTICE |
|---|
|
ELECTROSTATIC
DISCHARGE
Take the necessary protective measures
against electrostatic discharge before attempting to remove the cover.
Failure to follow these instructions can result in equipment damage.
|
| NOTICE |
|---|
|
BROKEN ENCLOSURE
Do not exert more torque than the amount specified.
Failure to follow these instructions can result in equipment damage.
|
Replacing the Filter
- Disconnect the power supply from the Box Module.
- Touch the housing or ground connection (not the power supply) to discharge any electrostatic charge from your body.
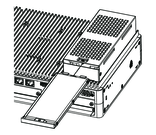
- Remove the screw for the fan filter insert.
- Remove the fan filter tray.
- Replace the fan filter.
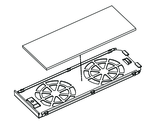
- Re-insert the fan filter tray and tighten the screw.NOTE: The necessary torque is 0.3 N•m (2.7 lb-in).