39.2.2 Transfer - SP5000 Series Open Box

-
When the write filter (write protection) is set on the system card (C drive), you will need to disable the write filter settings before transferring the project file to the display unit.
Refer to the "SP5000 Series Open Box Reference Manual" regarding how to perform this setting. You can download the manual from our support site (http://www.pro-face.com/trans/en/manual/1001.html).
Transferring via a USB cable or Ethernet (LAN) is the same as when using GP. Refer to the following.
 34.2 Transferring Project Files via USB Transfer Cable
34.3 Transferring Project Files via Ethernet (LAN)
This introduces how to transfer using external storage.
Transfer from Computer to Display Unit - Memory loader
Create project backup data on external storage and start the project on the display unit from the external storage.
The following shows the procedure when using a CFast Card.
Create Backup File
-
On the GP-Pro EX state toolbar, click the [Transfer Project] icon to launch the [Transfer Tool].
-
In [Select project], select the project you wish to transfer.
-
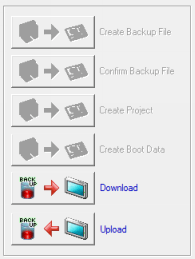
Click [Memory Loader], then click [Create Backup File].
-
Click [Browse] in the [Select Folder] dialog box.
-
In the [Browse For Folders] dialog box, specify the CFast card's root folder (directory) and click [OK].
-
To start creating data, in the [Select Folder] dialog box, click [OK].
-
After data creation is complete, click [Close].
The project file backup data, and data ("Memory Loader" folder) necessary for starting the display unit will have been created on the CFast card.
Download data
-
Insert the CFast card in the display unit, and power on the display unit.
-
To display the system menu, touch the top-right and then the bottom-left corner of the screen (or the top-left then bottom-right corner) within 5 seconds.
Touch [Offline].


-
When transferring a project file for the first time, touch [Transfer Memory Loader] on the [Welcome] screen.
-
If you are using WinGP that was not installed in the Program files folder, touch [Memory Loader]. Skip to step 6.
-
Touch [Transfer]-[Transfer Project File].
-
In the dialog box that displays, touch [Yes] to start WinGP. WinGP started with administrator rights displays in a separate window.
-
Touch [SD/USB].
-
Touch [Download].
-
Select the backup file (*.cmlx) and touch [Open]. The download will start.
-
If a transfer password has been set up, enter the password.
-
When a message appears indicating download is complete, touch [Close].
-
When removing the CFast card, always be certain to power off the display unit. There is a risk that data may be damaged on the CFast card.
-
When removing the SD Card or USB storage, refer to the following.
M.13.2 Detaching a device connected to the unit
Transferring from the Display Unit to Computer (or to Another Display Unit) - Memory Loader
Backup (upload) the project in the display unit to external storage.
On a PC, you can convert a backup file (*.cmlx) into a project file and edit it. You can also download and display the backup data on a different display unit.
The following shows the procedure when using a CFast card.
Create Boot Data
Proceed to Data Upload when there is already boot data ("Memory Loader" folder) in the external storage.
-
On the GP-Pro EX state toolbar, click the [Transfer Project] icon to launch the [Transfer Tool].
-
Click [Memory Loader], then click [Create Boot Data].
-
Click [Browse] in the [Select Folder] dialog box.
-
In the [Browse For Folders] dialog box, specify the CFast card's root folder (directory) and click [OK].
-
To start creating data, in the [Select Folder] dialog box, click [OK].
-
After data creation is complete, click [Close].
Data ("Memory Loader" folder) necessary for booting the display unit is created on the CFast card.
Upload Data
-
Insert the CFast card in the display unit, and power on the display unit.
-
To display the system menu, touch the top-right and then the bottom-left corner of the screen (or the top-left then bottom-right corner) within 5 seconds.
Touch [Memory Loader].
-
When transferring a project file for the first time, touch [Memory Loader] on the [Welcome] screen.
-
Touch [Upload].
-
Specify the backup file name, and then touch [Save].
Saves project data that is in the display unit as backup data (*.cmlx) on external storage.
-
If a transfer password has been set up, enter the password.
-
When the upload is complete, touch [Close].
-
Power off the display unit, and remove the CFast card.
-
When removing the CFast card, always be certain to power off the display unit. There is a risk that data may be damaged on the CFast card.
-
When removing the SD Card or USB storage, refer to the following.
M.13.2 Detaching a device connected to the unit
Proceed to Create Project File if you want to edit a backup file using GP-Pro EX.
Refer to Data Download if you want to use another display unit.
-
You cannot download to models other than SP5000 Series Open Box.
Create Project
-
Insert the CFast card into your PC.
-
On the GP-Pro EX state toolbar, click the [Transfer Project] icon to launch the [Transfer Tool].
-
Click [Memory Loader], and then click [Create Project].
-
In the displayed dialog box, select the backup file (*.cmlx) you want to convert to a project file, and then click [Open].
-
Enter the name and the location of the project file you are going to create and click [Save].
-
Confirm the settings in the dialog box, and then click [Create].
-
The following dialog box appears.
"Creating project files complete." When the message box displays, click [Close].