![]()
-
When using display units that support the SD card, "CF"/"CF Card" is replaced with "SD"/"SD Card".
Sample data at constant cycles starting from the designated time.
![]()
When using display units that support the SD card, "CF"/"CF Card" is replaced with "SD"/"SD Card".
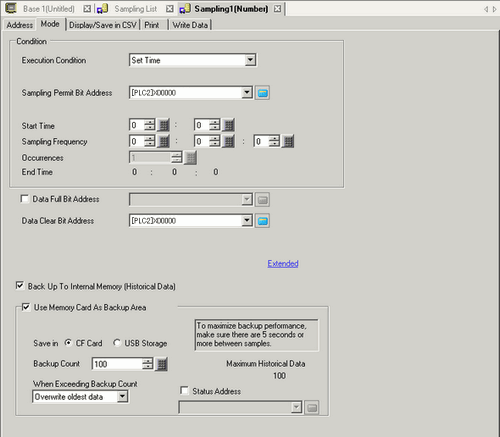
Execution Condition
Select the sampling action execution condition. Select [Set Time].
Sampling Permit Bit Address
Select the address which will control whether or not sampling will execute. When this address is ON, sampling will begin at the designated [Start Time], and after that, read in data at each cycle of the set [Sampling Cycle].
When this address is OFF, sampling will not occur even when the [Start Time] is reached.
Start Time
Designate the sampling action's start time. Set the time from 0 to 23 (hour), and 0 to 59 (minute).
Sampling Frequency
Set the period that sampling will occur in 15-second increments from 0 sec. to 23 hours, 59 minutes, 45 sec.
Occurrences
Select the number of times sampling will occur. If in the [Extended] area the [Overwrite old data after finishing the specified cycles] check box is selected, this can be from 1 to 65535 times. If the check box is cleared, the range is from 1 to 2048 times.
![]()
The settings range will be limited to ensure that the period from [Start Time] to [End Time] is within 24 hours. As well, the number of sampling groups and number of addresses (number of words) in the whole system will also be limited.
End Time
Set the [Start Time], [Sampling Cycle], [Occurrences], and the sampling end time will be displayed.
Data Full Bit Address
Select whether to verify that all sampling (designated [Occurrences] x [Number of Blocks] or the [Occurrences] x [Number of Days]) has ended. If all sampling has completed, the specified bit address is turned ON.
In the [Mode] tab's [Extended Settings], when the [Overwrite old data after finishing the specified cycles] check box is not selected and this address is turned ON, subsequent sampling will not occur. To resume sampling, turn [Data Clear Bit Address] to ON and erase the display unit's sampling data.
When the [Overwrite old data after finishing the specified cycles] check box is selected and even if this address is turned ON, sampling will continue.
![]()
This address is not turned OFF automatically. If the [Overwrite old data after finishing the specified cycles] check box is selected, please ensure that the bit is turned OFF in order to confirm the next sampling cycle.
Data Clear Bit Address
Designate the bit address to control the clearing of the sampling data. When this address turns ON, all the Sampling Group data stored in the display unit will be erased. After clearing the data, this bit will turn OFF.
Extended
Displays the [Extended] dialog box.
The contents is different depending on whether the [Overwrite old data after finishing the specified cycles] check box is selected or cleared.
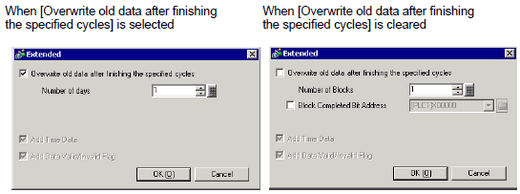
Overwrite old data after finishing the specified cycles
Select whether or not the data will be overwritten and stored, starting with the oldest data, after data has been sampled the designated number of times.
If this is set, even when all the data collection has completed ([Occurrences] x [Number of Days]), sampling will continue with the stored data, starting with the old data, being overwritten.
If this is not set, previous data will not be overwritten. The new rounds of data will be stored as separate blocks. After all data has been stored ([Occurrences] x [Blocks]), sampling will not occur until all stored data has been deleted.
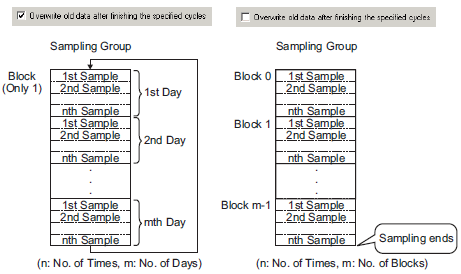
Number of Days
Set the number of days of sampling data that will be maintained in the display unit. Data from the designated number of days is stored, and then overwritten in order, starting with data on the first day. The setting range is from 1 to 2048. The setting range is automatically limited to ensure that the amount of [Occurrences] x [Number of Days] is 65535 or less.
Blocks
The complete set of data collected in the designated number of times is called a [block]. Designate the number of blocks to set inside one Sampling Group. The setting range is from 1 to 2048.
The settings range is automatically limited to ensure that the amount of [Occurrences] x [Blocks] is 65535 or less.
Block Completed Bit Address
Select whether to verify that the sampling for one block of data (the designated occurrences) has completed. If sampling for one block of data has completed, the specified bit address is turned ON.
Even if this bit address is turned ON, sampling will continue running until the specified [Number of Blocks].
![]()
This address is not turned OFF automatically. In order to verify completion of the next block, please ensure that this bit is returned to OFF.
Add Time Data
The sample time will be stored along with the sampled data. This setting is fixed to enable.
Add Data Valid/Invalid Flag
Stores an observation flag along with the data which monitors if the data has been saved properly. This setting is fixed to enable.
Retain Sampling Data (SRAM)
Select whether or not to save the sampling data to the backup memory (SRAM). If the sampling data is not saved, the data will be deleted when the power to the display unit is turned OFF or reset.
Back Up Sampling Data
Select whether or not to backup sampling data backup memory (SRAM) automatically in external storage every time the designated number of sampling cycles is completed. The data is saved in binary files.
Data backed up in the external storage will be used when displaying historical data in a historical trend graph. If data is not backed up in external storage, historical data will be displayed only for the number of occurences saved in the backup memory (SRAM).
![]() 25.14.1 Usage Capacity of Sampled Data
25.14.1 Usage Capacity of Sampled Data
![]()
When selecting this item, precautions on backing up and the maximum number of historical data that can be displayed in the Historical Trend Graph are displayed on the right-hand side. The maximum number is [Occurrences] x [Backup Count] of condition settings.
On the following models, the index file "TSAMPINDEX.idx" is automatically created during backup.
SP5000 Series
GP4000 Series (excluding GP-410*)
GP6000 Series
ST6000 Series
STM6000 Series
STC6000 Series
ET6000 Series
GPH6000 Series
This index file is a reference for the display unit so it can display historical data in a Historical Trend Graph. For more information about index files, please refer to the following.
![]() 19.8.3 Display Historical Data
19.8.3 Display Historical Data
Save in
Select the "Save in" location for backup data from [CF card], [SD Card] and [USB storage].
Folders are automatically created for each sampling group in the "Save in" location. The saved file name will be Time Stamp (year/month/day/hour/minute/second when saved).
For example, when it is saved at 14:30:05 on July 2, 2007
\SAMP**\T070702_143005#.bin
("**" represents sampling group number and "#" represents index number)
![]()
The index number for file names is from 0 to 9. You can save up to 10 files at the same time.
Backup Count
Specify the number of times (1 to 500) to write the backup data.
When Exceeding Backup Count
Select an action when the number of backup files exceeds the value set in the Backup Count.
Overwrite oldest data
Delete the oldest file and add a new file.
Interrupt Backup
Stops backup. "9" (number of files exceeded) is stored in the status address.
Status Address
Indicates whether the saved operation status and error information are stored in the specified address.
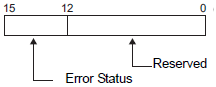
The error status indicates the following error codes.
Error Code
|
Bit 12 to 15 |
Contents |
Details |
|---|---|---|
|
0 |
Completed Successfully |
Transfer completed successfully. |
|
1...3 |
Reserved |
-- |
|
4 |
No external storage |
There is no external storage device inserted into the display unit. The CF Card cover is open. The USB storage is not formatted properly or is damaged. |
|
5 |
Write Error |
The external storage does not have enough free space or the storage was disconnected during write operation. 10 backup data files with the same time stamp already exist because the time setting of the display unit was restored, etc. The SD Card is write-protected. The index file is read-only. (SP5000 series or GP4000 series) |
|
6 |
Reserved |
-- |
|
7 |
CF Card Error |
The CF Card is not formatted properly or is damaged. |
|
8 |
Reserved |
-- |
|
9 |
Excess Number of Files |
Exceeded number of files set up |
![]()
Even if the error status is saved, retains the save request. The save process runs the moment the error status is released. If the [Data Full Bit Address] turns ON while still in error status, the retained save request is discarded, and the save request for the new backup data is now retained.