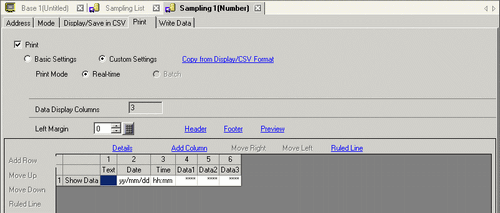
Select whether to print. When printing sampling data, ensure that this check box is selected and select the print format.
Basic Settings/Custom Settings
Select the print format setting mode.
Basic Settings
Use a preset format to easily configure settings.
Custom Settings
Set a customized format.
Copy from Display/ CSV Format
When the format is set on the [Display/Save in CSV] tab, copy the settings from the [Display/Save in CSV] tab. Use this feature when you want to print data using the Display/Save in CSV format.
![]()
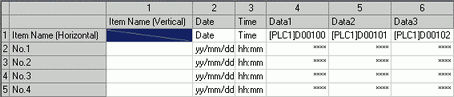
The Display/Save in CSV format Item Name (Horizontal)/Block Name (Vertical) is handled as a Text row/Text column in the print settings.
Print Mode
Select the print timing.
When the [Print Mode] is set to [Batch], select an address to control the printing. When 0 bit of the designated address turns ON the printing starts.
Two sequential Words are used to store the Word Address: the control Word and the block number. Select the block number and start the printing.

Print Completion Bit Address
When the [Print Mode] is set to [Batch], select an address to confirm the completion of the printing.
Designates the Bit Address to be turned ON when data is printed out for each block. After confirming that this Bit Address is turned ON, perform the next printing.
Data Display Columns
Displays the number of data columns.
Row/Column
You can set the following items when in the [Mode] tab's Extended area the [Overwrite old data after finishing the specified cycles] check box is cleared.
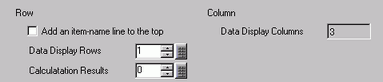
Add an item-name line to the top
Designate whether or not to add text rows on top of the Data row. The sampling addresses are displayed in the editing area as the Data column item names. Cells that have an address displayed cannot be edited.
Data Display Rows
Set the number of data rows to print from 1 to the [Occurrences] set on the [Mode] tab.
![]()
Adjust the number of data display rows to the [Occurrences].
Calculation Results
The number of calculation rows can be from 0 to 4.In the Calculation rows, you can display values (Total, Average, Max, Min) calculated from data from the designated [Occurrences].
Data Display Columns
Displays the number of data columns.
Left Margin
Sets the left margin when printing data, from 0 to 80 single-byte characters. It does not affect headers and footers.
Header/Footer
Opens the [Edit Header]/[Edit Footer] dialog box.Input text you wish to print as a header/footer.The number of characters that can be entered is 160 char./line x 40 lines.
![]()
When [Overwrite old data when designated block count finishes] is set in the Action, printing will not be performed even if the Header/Footer is set. Only the Data rows will be printed.
Preview
Opens a preview screen to confirm the print image.
Details
Opens up a dialog box to configure detail settings for the column or Calculation row selected in the Preview area.
![]() 25.11.8.1 Print (Custom Settings) / Date Set
25.11.8.1 Print (Custom Settings) / Date Set
![]() 25.11.8.2 Print (Custom Settings) / Time Set
25.11.8.2 Print (Custom Settings) / Time Set
![]() 25.11.8.3 Print (Custom Settings)/Data Settings - Data Type
25.11.8.3 Print (Custom Settings)/Data Settings - Data Type
![]() 25.11.8.4 Print (Custom Settings)/Data Settings - Style
25.11.8.4 Print (Custom Settings)/Data Settings - Style
![]() 25.11.8.5 Print (Custom Settings) / Text Settings
25.11.8.5 Print (Custom Settings) / Text Settings
![]() 25.11.8.6 Print (Custom Settings)/Calculation Settings - Data Type
25.11.8.6 Print (Custom Settings)/Calculation Settings - Data Type
![]() 25.11.8.7 Print (Custom Settings)/Calculation Settings - Style
25.11.8.7 Print (Custom Settings)/Calculation Settings - Style
Add this Column
Insert a column in front of the column selected in the Preview area. Choose from a [Date], [Time], [Data], or [Text] column. You can directly input the desired text in each cell of an inserted [Text] column.
When adding a [Data] column, the [Select Print Data] dialog box appears where you can select a data column (address) to add.
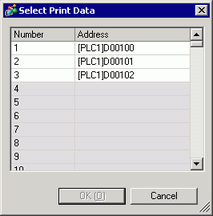
To add multiple addresses, drag the mouse to select consecutive columns. If you click columns to add while pressing the [Ctrl] key, you can select separate addresses.
Move Right/Move Left
Move the column you selected in the preview area to the right/left.
Ruled Line
Set the ruled line to print. Select from [Right Border], [Left Border], [Right+Left Border], or [Vertical Borders].
Add this Row
Insert a [Text] row in front of the row selected in the Preview area.
You can directly input the desired text in each cell of an inserted [Text] row.
![]()
When multiple calculation rows are set, you cannot input a [Text] row between two calculation rows.
Move Up/Down
Move the [Text] row selected in the Preview area upward/downward.
Ruled Line
Set the ruled line to print. Select from [Top Border], [Bottom Border], [Top+Bottom], [Horizontal Borders].
Preview area
Displays the set contents with the selected format.
If [Overwrite old data after finishing the specified cycles] is selected on the [Mode] tab's Extended settings, only one data row will display. If the [Overwrite old data after finishing the specified cycles] check box is cleared, the data rows equal the designated [Occurrences].
When [Overwrite old data after finishing the specified cycles] check box is selected
![]()
When [Overwrite old data after finishing the specified cycles] check box is cleared