![]()
-
Please refer to the Settings Guide for details.
 26.27 Common Settings (Enhanced Recipe) Settings
26.28 Enhanced Recipe List Settings Guide
26.29 Enhanced Recipe Data List Settings Guide
![]()
Please refer to the Settings Guide for details.
![]() 26.27 Common Settings (Enhanced Recipe) Settings
26.27 Common Settings (Enhanced Recipe) Settings
![]() 26.28 Enhanced Recipe List Settings Guide
26.28 Enhanced Recipe List Settings Guide
![]() 26.29 Enhanced Recipe Data List Settings Guide
26.29 Enhanced Recipe Data List Settings Guide
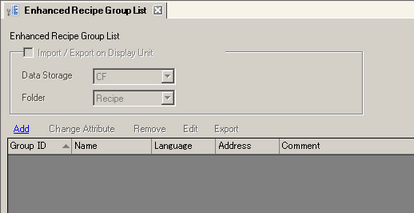
From the [Common Settings] menu select [Enhanced Recipes] to display the following screen.
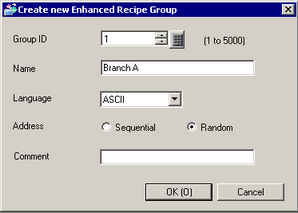
Click [Add] to display the following dialog box.
Specify the [Group ID] and enter the [Name] in single-byte characters. In the [Language] field, select the language character set for the recipes.
To create recipes in various data formats, for the [Address] select the [Random] option.
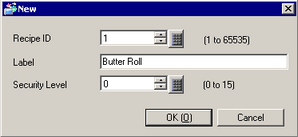
Click [Add] to display the following dialog box.
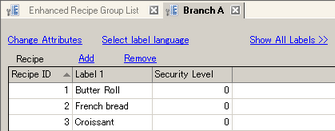
Specify the [Recipe ID], [Label], and [Security Label] and then click [OK]. One recipe is now added to the recipe group.
![]()
The [Label] appears in the Enhanced Recipe List as a recipe label.
Repeat this procedure to add two more recipes. (For example, French bread and croissant)
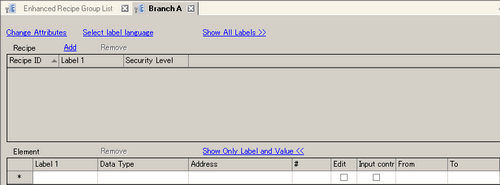
The list shows recipes in the group.
Set up data for each recipe.
On the [Recipe] list, select the row for [Recipe ID] "1" and double-click the [Element] list's [Label] cell to define the element label. (For example, Flour)
Click the [Data Format] cell to define the data format. (For example, 16 Bit Dec, No Sign)
Click the [Address] cell to set an address as the destination (or source) for data transfer. (For example, D100)
In the [Consecutive Addresses] field, specify the number of addresses. If [Data Format] is [Text], set the number of characters.
To allow editing data (element value) on the display unit, set [Edit] to [ON]. Select the [Input Limit] check box and specify a character range in the [Min] and [Max] fields.
In the example for the recipe labels (for example, "Butter roll" column) double-click the cell and enter an element value of 300.)
![]()
![]()
This setting is displayed as an element label and an element value on the Enhanced Recipe Data List.
Repeat this procedure to set up recipe data for recipe ID 2 and 3.
![]()
![]()
By selecting multiple labels in [Recipe] (hereinafter referred as recipe labels), lists the elements for each of the selected labels in a column. You can select multiple recipe labels as follows.
Hold [Shift] key and click
Hold [Ctrl] key and click
On the [Element] list, set other labels (hereinafter referred as element labels) and element values as follows.

![]()
Clicking [Export] outputs the settings as a CSV file to the specified folder.
By attaching external storage with a CSV file to the display unit, allows you to change the display unit's enhanced recipe data with the data on external storage. To save to a location, select the external storage selected in the [Browse...] field as the import/export destination.
If no file name is defined, the following file name is output.
#H_RecipeGroupID_#H_RecipeGroupName.csv
For example, when the value of #H_RecipeGroupID is 1, and #H_RecipeGroupName is "Branch A", the file name is "00001_Branch A.csv".
![]() 26.20 Importing and Exporting Enhanced Recipe Data
26.20 Importing and Exporting Enhanced Recipe Data
Open the screen editor. On the [Parts] menu, point to [Enhanced Recipe] and select [Enhanced Recipe List] or click ![]() to draw the list on the screen.
to draw the list on the screen.
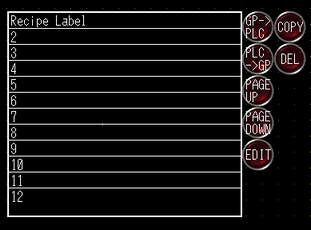
Double-click the Enhanced Recipe List to display the following dialog box.
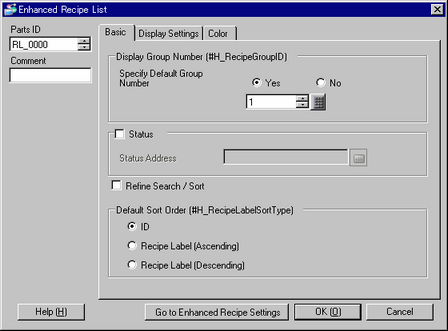
In the [Specify Default Group Number] field select the [Yes] option so you can define a recipe group number.
Select the [Status] check box to specify an address where the Enhanced Recipe List editing results (status) are stored.
Select the [Refine Search/Sort] check box to select and refine searches of recipe labels, or sort recipe labels, in the Enhanced Recipe List.
![]()
The following section lists models that support Refine Search/Sort.
![]() 1.5 Supported Features
1.5 Supported Features
Select a font type and character size so that the Enhanced Recipe List has a touch area of 20 pixels or more in length and width. The touch areas smaller than this may not respond to your touch.
To display the touch area of a part, from the [View] menu click [Preferences]. In the Preferences dialog box, click [Screen Edit Style] to open its settings. Click [Display] tab and select [Show Touch Areas].
Set the settings in the [Display] tab and [Color] tab as required and click [OK].
![]()
You can edit the label and color of special switches used with the Enhanced Recipe List.
![]() 10.15.4.2 Special Switch - Switch Common/Lamp/Color/Label
10.15.4.2 Special Switch - Switch Common/Lamp/Color/Label
On the [Parts] menu, point to [Enhanced Recipe] and select [Enhanced Recipe Data List] or click ![]() to draw the list on the screen.
to draw the list on the screen.
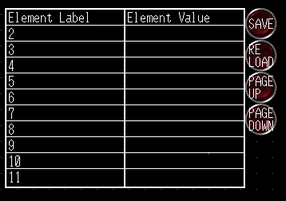
Double-click the Enhanced Recipe Data List to display the following dialog box.
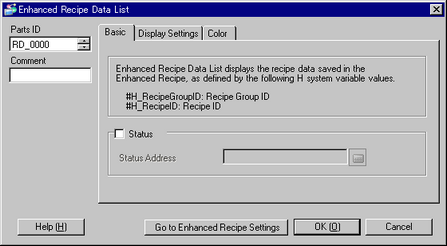
Select the [Status] check box to specify an address where the Enhanced Recipe Data List editing results (status) are stored.
Define the settings in the [Basic] tab, [Display] tab and [Color] tab as necessary and click [OK].
![]()
Select a font type and character size so that the Enhanced Recipe Data List has a touch area of 20 pixels or more in length and width. The touch areas smaller than this may not respond to your touch.
To display the touch area of a part, from the [View] menu click [Preferences]. In the Preferences dialog box, click [Screen Edit Style] to open its settings. Click [Display] tab and select [Show Touch Areas].
You can adjust the column width in the Enhanced Recipe Data List by dragging the line between element labels and element values.
You can edit the label and color of special switches used with the Enhanced Recipe Data List.
![]() 10.15.4.2 Special Switch - Switch Common/Lamp/Color/Label
10.15.4.2 Special Switch - Switch Common/Lamp/Color/Label