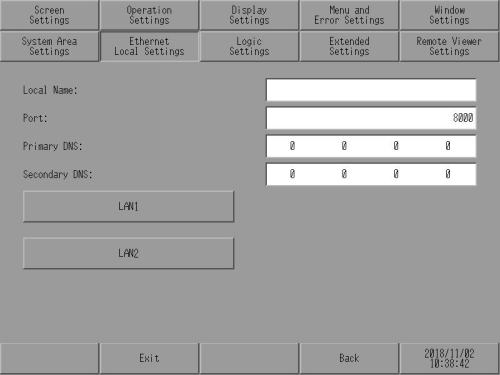
Adjust the settings for the Ethernet connection.
![]()
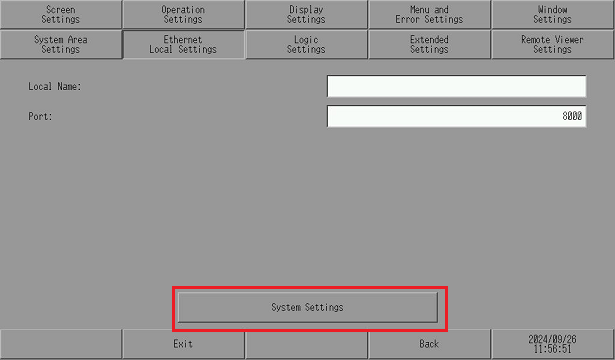
When using GP6000 Series or GPH6000 Series, except for [Local Name] and [Port], configure in the System Settings.
Touch the [System Settings] button to move to the System Settings. For more information, refer to the corresponding hardware manual
Local Name
To specify the node name used for the network, enter up to 32 single-byte characters.
![]()
When using GP-4100 Series (Monochrome Model), set up with up to 16 alphanumeric characters.
Port
Specify the port number (5001 to 65516). Twenty consecutive port numbers starting from the specified port number are used. However, when the display unit is showing the forced transfer screen, the port number is fixed to 8000.
![]()
To execute an automatic search via LAN when transferring a project file, specify the same port number as the number specified in from the [Transfer Tool], [Transfer Setting], [Communication Port Settings] area's [Port (Search)] field.
Primary DNS / Secondary DNS
When using the e-mail feature, configure the DNS server IP address.
LAN
Set IP Address and MAC address of LAN port.
If the display unit has multiple LAN ports as shown below, set each LAN port.
When using SP5000 Series
When using EZ LAN Adapter with GP4000 Series models with a LAN port (excluding GP-410*)
To check which models support EZ LAN Adapter, refer to the following.
![]() 1.5 Supported Features
1.5 Supported Features
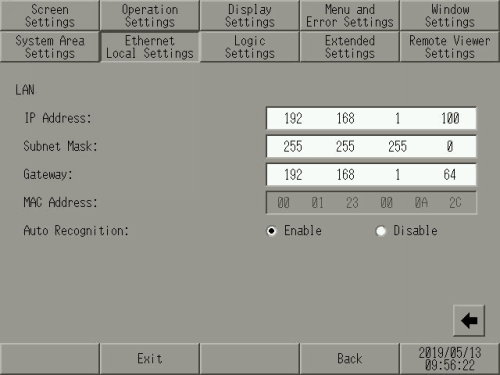
The following screen displays when [LAN] is selected.
DHCP Client
Set whether or not IP address settings are assigned to the display unit from a connected DHCP server.
![]()
If the IP address is updated from the DHCP server during operation, the display unit will reboot.
When [DHCP Client] is enabled, the time it takes for the display unit to start up until the initial screen is displayed is longer.
If the DHCP server is not available, an error is displayed on the screen and the previously used IP address is set. It may take some time before the error is displayed.
![]()
For models that support [DHCP Client], refer to the following.
![]() 1.5 Supported Features
1.5 Supported Features
When communicating with the following products or devices, either disable [DHCP Client] or fix the IP address assigned to the display unit by the DHCP server so that the IP address does not change automatically.
Pro-Server EX
Remote HMI
GP-Viewer EX
Ethernet Multilink
Camera-Viewer EX
Device/PLC
IP Address
Sets up the display unit's IP address. The IP address is 32 bits and entered in four 8-bit units, entered in decimal.
![]()
If the display unit has multiple LAN ports, set the IP addresses for each LAN port with different network segments. If you set an IP address with the same network segment in the display unit, the communication may not work properly.
Even if the display unit has multiple LAN ports, it cannot offer routing or bridge functionality.
Subnet Mask
Sets the subnet mask. If you are not using a subnet mask, enter [0].
Gateway
Sets up the gateway IP address. If you are not using a gateway, enter 0. Only a single gateway can be set up.
![]()
When using any of the following models with multiple LAN ports, you can set a gateway address for only one of the ports. For the other port, set [0.0.0.0] as the gateway address.
SP5000 Series
Using the EZ LAN Adapter with GP4000 Series models (excluding GP-410*) with a LAN port
MAC Address
Displays the display unit's MAC address.
Auto Recognition
Select whether to automatically adjust to the speed and communication format of the connected node. When automatic recognition is disabled, you must set up the [Speed Settings] and [Duplex] manually.
Speed Settings
If you disable [Auto Recognition], select the network speed from either [100M] or [10M].
Duplex Settings
If [Auto Recognition] is disabled, select the network communication format from either [Half] or [Full].