31.5.6.1 Change Counter Format - High Speed Counter (Single-phase Settings)
The counting system can be changed from up-counter to down-counter, or from down-counter to up-counter while counting. Switching counting can be set per CH for which you allocate the counter.

-
If you switch the counter while counting, you might miss 1 pulse at the time of switching.
-
If you change the [Counter Operation] or [Edge Settings] in the middle of a count operation, LT3000 series or STC6000 series and LT4000 series handle the change differently.
LT3000 Series / STC6000 Series: Continue counting from the current counter value.
LT4000 Series: Reset the current counter value to "0" and restart counting.
Summary
In GP-Pro EX, you can set up the initial value for each parameter. After the system is running, you can change parameters with system variables.
The procedure for changing the counting format is summarized below.
Setting Up Initial Values
Refer to the setup procedures for GP-Pro EX
Changing After System is Running
-
Set counter operations and transition settings in [Change Counter Format]
-
Set the parameter under [Request Special I/O Parameter change].
-
Under [Special I/O Parameter Change Completed], acknowledge that the parameter has been changed.
-
[Control Special I/O] to execute.
-
See "Special I/O state" for acknowledgment.

-
The [Request Special I/O Parameter Change] and [Special I/O Parameter Change Completed] operations reflect all the CH parameters you change.
-
Right after transferring, operations use parameter values set up in GP-Pro EX. Any restarts, which include going off-line, reset, and turning power OFF, use stored system variables as parameters.
Set Up Process in GP-Pro EX
From the [System Settings], click [I/O Driver] and click [High Speed Counter Settings] on the [Internal Driver] tab.

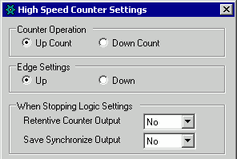
In the [High Speed Counter Settings] dialog box, select the Up or Down Count radio button in the Counter Operation area.
-
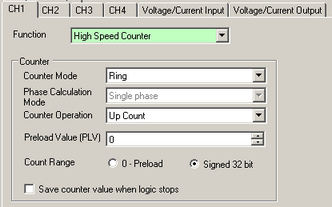
From the [Project] menu, point to [System Settings] and click [I/O Driver]. Select [High Speed Counter] in [Function].
-
Select a counter operation from [Counter Operation].
Set Up Process with System Variables
-
Define the Counter format using the system variable #L_HSC*_MOD. The system variable name adjusts to match the CH pulse output to which it's mapped.
-
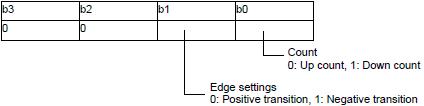
The system variable (#L_HSC*_MOD) details are as shown below. Turn bit 0 OFF to count up, and turn it ON to count down.
Furthermore, turn OFF bit 1 to detect the rising edge, or turn ON the bit to detect the falling edge.
#L_HSC*_MOD

HSC method
-
You can cahnge the counting method by using parameters in [Request special I/O parameter change].
"Request special I/O parameter change" changes the parameter in the system variable (#L_ExIOSpParmChg). Then, acknowledge the completion under [Special I/O parameter change completed]. Depending on the CH to which you allocate the parameter, the request flag and the completion flag will have different bit positions.
#L_ExIOSpParmChg

Request Special I/O Parameter Change

This variable uses the CH specified in the I/O driver settings as the 4-bit configuration information to request the special I/O parameter change.
a: CH1 special I/O parameter change request
c: CH2 special I/O parameter change request
e: CH3 special I/O parameter change request
g: CH4 special I/O parameter change request
You can also read the previous settings using the Operation bits below.
b: CH1 special I/O parameter read request
d: CH2 special I/O parameter read request
f: CH3 special I/O parameter read request
h: CH4 special I/O parameter read request
-
The following illustration describes details about variables mapped to [Special I/O Parameter Change Completed]. The monitor bit differs, depending on the CH that is mapped to the high-speed counter.

a: CH1 special I/O parameter change complete
c: CH2 special I/O parameter change complete
e: CH3 special I/O parameter change complete
g: CH4 special I/O parameter change complete
You can also read the previous settings using the watch bits below.
b: CH1 special I/O parameter read complete
d: CH2 special I/O parameter read complete
f: CH3 special I/O parameter read complete
h: CH4 special I/O parameter read complete
-
The figure below shows the flag timing chart for the special I/O parameter change request and completion.
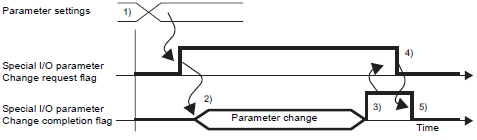
1) Configure counting and edge settings.
2) Turn ON the request flag for [Change Special I/O parameter] to change the parameter.
3) Once the parameter is changed, the completion flag turns ON.
4) Acknowledge that the completion flag is ON and turn the request flag OFF.
5) When the request flag is recognized as OFF, the completion flag turns OFF.