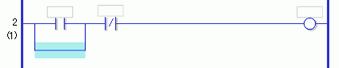
Select where you want to start the branch.
In this case, select the left of the NO instruction (parameter "a").
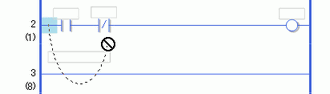
Click the icon ![]() . A dashed line is drawn between the start and end points of the branch.
. A dashed line is drawn between the start and end points of the branch.

![]()
-
You can also insert a branch in either of the following ways.
-
Right-click and then click [Insert Branch (B)].
-
Press CTRL+B.
Press the LEFT ARROW or RIGHT ARROW key to determine the final position, and then press ENTER. The branch will be inserted.
![]()
-
You can define the end position using your mouse. Click where the pointer changes back to
 as an end point to insert the branch.
 -
You can click the start point of the branch in step 1, and drag to the right of the NO instruction (Normally Open). Release the left mouse button when the pointer changes from
 to and the branch will be inserted.
The branch end is not valid in areas where the pointer is shown as. If this symbol shows, the branch will not be inserted after you release the left mouse button.
-
While multiple instructions or shunts are selected, a branch for detouring from the instruction will be inserted when [Insert Branch (B)] is performed.

Insert an instruction in the branch.
![]() 30.5.1 Inserting Instructions
30.5.1 Inserting Instructions
