If a switch is created, you can set the color and label for the switch.
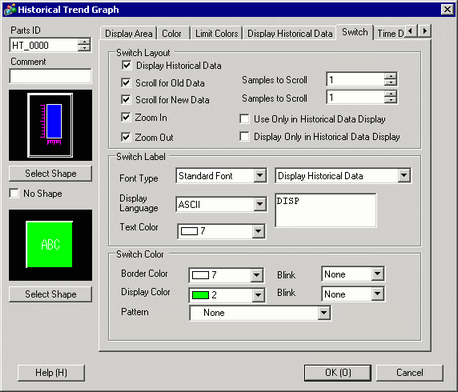
Switch Layout
Display Historical Data
Set whether to place a switch on the screen to display historical data.
When you press the switch displays in Display Historical Data mode, you can scroll back to previous data on the display. Pressing the switch again cancels the Display Historical Data mode, and the current values are displayed.
Only one switch of this kind can be placed on a Graph using Display Historical Data.
Scroll for Old Data
Set whether to place a switch to scroll backward from current to historical data. Multiple switches of this kind can be placed on a Graph.
Samples to Scroll
Set the number of samples to scroll. The setting range is from 1 to 65535.
Scroll for New Data
Set whether to place a switch to scroll forward from historical data to the most current data. Multiple switches of this kind can be placed on a Graph.
Samples to Scroll
Set the number of samples to scroll. The setting range is from 1 to 65535.
Display only in Zoom In/Zoom Out/Display Historical Data
Specify whether a switch for Zoom In/Zoom Out Display is placed.
Zoom Display
Zoom in 2 times, 4 times, and 8 times every time the switch is pressed.
Zoom Out Display
Zoom out the zoomed image to 1/2, 1/4, and 1/8. If the [Thin Out Value] is set in the [Display] tab, thin out display is applied when you zoom out from Actual size.
![]() 19.7 Zoom In/Out a Trend Graph
19.7 Zoom In/Out a Trend Graph
Display only in Display Historical Data
Specify whether to use the Zoom In/Zoom Out switch only in Display Historical Data or also use in Normal Mode. This setting is available only when [Display Historical Data] and [Show Cursor] are set up in the [Display Historical Data] tab. Performs Zoom In/Zoom Out Display with the cursor position as a reference point when checked.
Switch Label
Font Type
Set the font type for the switch label from [Standard Font] or [Stroke Font].
Display Language
Select the language that to display on the switch label. Select the display language: [Japanese], [ASCII], [Chinese (Traditional)], [Chinese (Simplified)], [Korean], [Russian (Cyrillic)], or [Thai].
Select Switch
Select the Switch whose label you want to set.
Label
Enter the text that you want to display on the switch selected in [Select Switch].
Text Color
Set a color for the label text.
Blink
Select whether the [Text Color] blinks and the blink speed.
Switch Color
Border Color
Set the border color for the switch.
Display Color
Set the color for the switch.
Pattern
Set the pattern for the switch.
Pattern Color
Set the pattern color for the switch.
Blink
Select the blink and blink speed. You can choose different blink settings for the [Border Color], [Display Color] and [Pattern Color].
![]()
Depending on your display unit's model and [Color] settings, you may not be able to set Blink (from the [Project] menu, point to [System Settings] and click [Display Unit]).
![]() 1.6 Supported Colors
1.6 Supported Colors
Color
Select the Switch color. The display will show a different colored image as the selected part image.
Select Shape
Open the Select Shape dialog box to choose the switch shape.
Status Display
Displays the shape and status of the switch.
![]()
Depending on the shape, you may not be able to set the [Display Color], [Pattern Color], [Border Color], [Color], and so on.