![]()
-
For details on the settings, see the following.
 4.3 Startup Dialog Box
4.4 Connection Dialog Box
![]()
For details on the settings, see the following.
![]() 4.3 Startup Dialog Box
4.3 Startup Dialog Box
![]() 4.4 Connection Dialog Box
4.4 Connection Dialog Box
Double-click the Camara-Viewer EX shortcut on the desktop  , or from the [Start] menu, point to [All Programs], [Pro-face], [Camera-Viewer EX] and then click [Camera-Viewer EX].
Camera-Viewer EX starts and opens the startup dialog box.
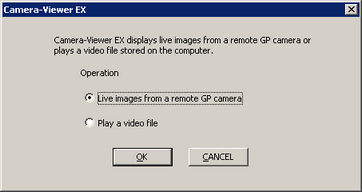
Select [Live images from a remote GP camera] and click [OK]. The connection dialog box appears.
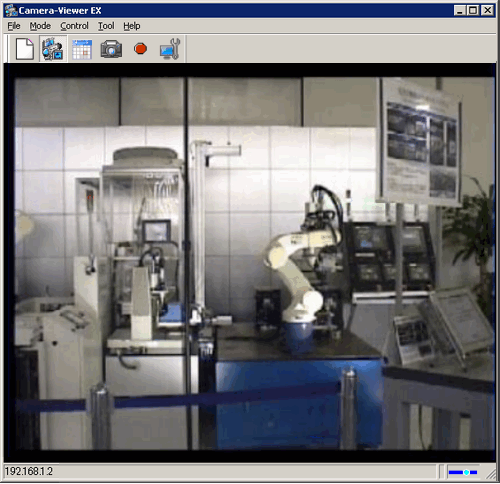
In [GP IP Address], enter the IP address of the display unit to connect. (For example, 192.168.1.2)

Click ![]() the drop down icon to search for a display unit connected to the network. After the search is complete, all display units on the network will be listed.
the drop down icon to search for a display unit connected to the network. After the search is complete, all display units on the network will be listed.
![]()
Please consult your network administrator about mapping IP addresses.
Click the [CONNECT] button to connect to the display unit defined in [GP IP Address]. After the connection is established, Camera-Viewer EX displays video from the display unit's video camera.
![]()
When you click [Capture]![]() , a still image of the video is saved as a JPEG file and displayed in the associated application.
, a still image of the video is saved as a JPEG file and displayed in the associated application.
![]() 4.7 Screen Capture
4.7 Screen Capture
From the [File] menu, select [Save as].
The [Save As] dialog box appears. Define the storage location and file name and click [Save].
![]()
The file name can contain up to 255 characters, including the file path and extension.
To close the project, from the [File] menu select [Exit] or click the icon in the top right corner.
Camera-Viewer EX will end.
![]()
From the next time, when you wnat to display the same video camera image from the display unit, open the saved Camera-Viewer EX settings file.