Remote RAS setting procedure
(for Pro-Server with Pro-Studio)

Japanese

Introduction
Summary
Remote RAS setting procedure
Publication Record

Introduction

Thank you very much for purchasing the Digital Electronics Corporation's product.
Please be sure to read this file's information carefully to familiarize yourself with both the unit's correct operation procedures and its features.

1. It is forbidden to copy the contents of this manual in whole, or in part, without the permission of the Digital Electronics Corporation.
2. The information in this manual is subject to change without notice.
3. This manual was written with care; however, if you find any error or omissions, please contact Digital Electronics Corporation and inform them of your findings.
4. Please be aware that Digital Electronics Corporation is not responsible for any damages resulting from the use of our products.
5. All product names that appear in this document are the trademarks of their respective companies.
6. Even though the information contained in and displayed by this product may be related to intangible or intellectual properties of the Digital Electronics Corporation or third parties, the Digital Electronics Corporation shall not warrant or grant the use of said properties to any users and / or other third parties.


Return to Top

Summary

This setting procedure shows the device setting and monitoring steps. For other functions of Pro-Server with Pro-Studio, refer to "Pro-Server with Pro-Studio Operation Manual." Regarding the restrictions for monitoring, refer to the pages related to Remote RAS settings of the operation / reference manual for the applicable model.


Return to Top

Remote RAS setting procedure

1. Copying Remote RAS Setting File
2. Addition and Edit of Network Entry Node
3. Addition and Edit of Symbol
4. Monitoring Method

Return to Top

1. Copying Remote RAS Setting File


Copy the Remote RAS setting file [PL_RAS.TBL] to the save folder (Default: C: \ Program Files \ Pro-face \ Pro-Server with Studio \ PLCTBL) of the Pro-Server with Pro-Studio TABLE file.

* Copy the Remote RAS setting file when Pro-Server with Pro-Studio is not started.

Return to Remote RAS setting procedure

2. Addition and Edit of Network Entry Node


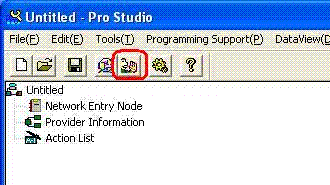
2.1 Start Pro-Studio. (Pro-Server starts automatically and the Pro-Server icon is in the taskbar.)

2.2 Click the "Search Active Node" icon in the toolbar.


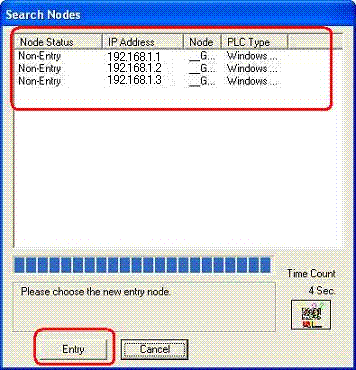
2.3 The "Search Nodes" dialog is displayed. After checking the IP address of the target IPC, select the appropriate node and click the [Entry] button.


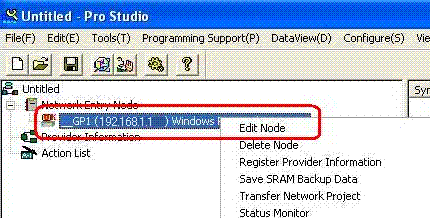
2.4 The entered node is added to the tree list as shown below.


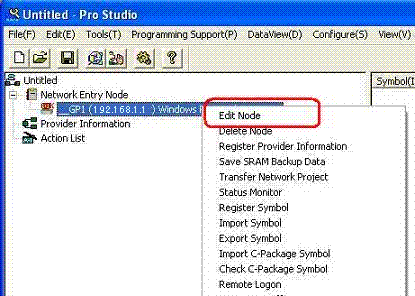
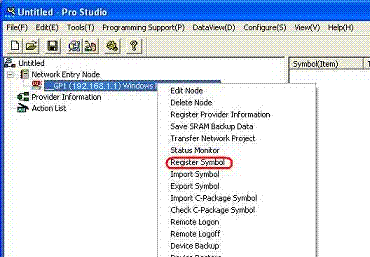
2.5 Right-click on the added node to display the menu. From the menu, select "Edit Node"


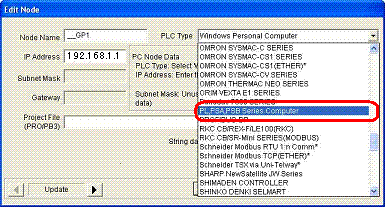
2.6 The "Edit Node" dialog is displayed. From the "PLC Type" pull-down menu, select "PL, PSA, PSB Series Computer" and click the [OK] button.


Return to Remote RAS setting procedure

3. Addition and Edit of Symbol


3.1 Right-click on the added node to display the menu. From the menu, select "Register Symbol".


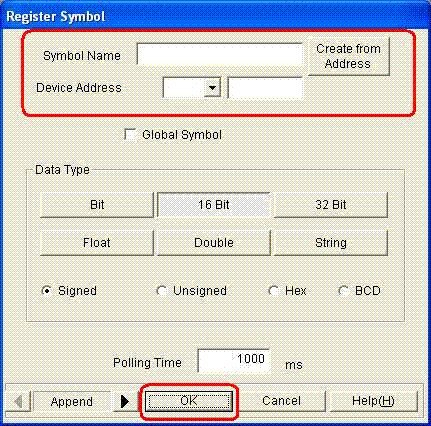
3.2 The "Register Symbol" dialog is displayed. Referring to the Device Address List of the user's / reference manual of the target model, register the device you want to monitor and click the [OK] button.

3.3 The registered symbol is displayed on the right of the screen.

Return to Remote RAS setting procedure

4. Monitoring Method


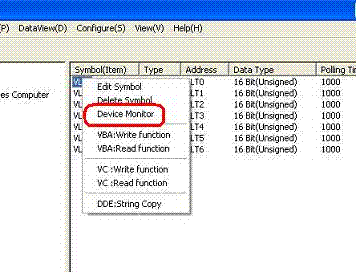
4.1 Select the symbol you want to monitor and right-click on it to display the menu. From the menu, select "Device Monitor"


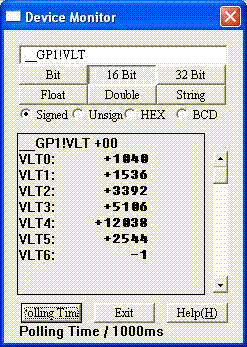
4.2 The "Device Monitor" dialog of the specified symbol is displayed.


Return to Remote RAS setting procedure

Publication Record

08/10/2007 First Published

Return to Top

Copyright (c) 2007 Digital Electronics Corporation