|
| GP-PRO/PBIII for Windows operation on Windows® 7 is described below. |
| |
| IMPORTANT |
| - |
This information is checked with administrator rights. |
| - |
Windows® 7 is not officially supported by GP-PRO/PBIII for Windows.
Please check the operation on Windows® 7 before using GP-PRO/PBIII for Windows. |
|
|
| |
| ■ GP-PRO/PBIII for Windows Version |
| |
C-Package03 Ver. 7.29
Pro-Control Editor Ver. 5.10 |
| |
| ■ Windows® 7 Edition |
| |
Windows® 7 Ultimate (32 bits) Japanese Version, Ordinary Mode/Windows XP Mode
Windows® 7 Professional (64 bits) English Version, Ordinary Mode/Windows XP Mode |
| |
|
| * When GP-PRO/PBIII for Windows is used on Windows® 7, there are 4 restrictions as described below. |
| |
| 1. |
There is a restriction in transfer and simulation depending on combinations of OS environments and the transfer method. →Details |
| 2. |
"Help" doesn't start. →Details |
| 3. |
There are notes concerning the save destination for project files. →Details |
| 4. |
During backup file creation, an error message may appear and data may not be created. →Details |
|
|
|
| [1] |
There is a restriction in transfer and simulation depending on combinations of OS environments and the transfer method. |
| |
| For the restrictions, see the table below. |
| |
Japanese Version
|
English Version |
Windows® 7
Ultimate
32 bit
Ordinary Mode |
Windows® 7
Ultimate
32 bit
Windows XP Mode*7 |
Windows® 7
Professional
64 bit
Ordinary Mode |
Windows® 7
Professional
64 bit
Windows XP
Mode*7 |
Serial transfer cable
(GPW-CB02) |
|
 *1 *1 |
|
 *1,*5 *1,*5 |
Serial - USB conversion cable
(USB-RSAQ3 from IO Data) |
|
 *2 *2 |
-
(Converter's
driver doesn't
support
64 bit)
|
 *2,*5 *2,*5 |
USB transfer cable
(GPW-CB03)
|
 *3 *3 |
 *2 *2 |
- |
 *2,*5 *2,*5 |
| Ethernet transfer |
Only available
in the case
of 1:1 *6 |
 *4 *4 |
Only available
in the case
of 1:1 *6 |
 *4 *4 |
|
| |
| *1: |
To use a COM port for connecting a serial transfer cable (GPW-CB02) in the Windows XP mode, the settings need to be made. (→ Settings) |
| *2: |
To use a USB port in the Windows XP mode, the settings need to be made. (→Settings) |
| *3: |
As "Automatic Recognition" doesn’t perform, the driver of a transfer cable needs to be installed manually. (→Settings) |
| *4: |
To use an Ethernet port in the Windows XP mode, the settings need to be made. (→Settings) |
| *5: |
Transfer is possible for SP1 (Service Pack1) only. Without SP, switching to the transfer mode is possible, but the subsequent transfers cannot be made. |
| *6: |
When multiple graphic operator interfaces are connected via Ethernet, if [Ethernet: Auto Acquisition] in Transfer Settings is selected, the list of the connected graphic operator interfaces will not be detected. When multiple graphic operator interfaces are connected via Ethernet, specify "IP Address" of each graphic operator interface manually and transfer the data individually. (→Settings) |
| *7: |
For transfer in the Windows XP mode, PC's CPU must support virtualization.
To check if your PC supports virtualization or not, you can check it with the free software that can be downloaded from the following site:
[Download Site]
- Japanese
- English
| NOTE |
The Windows XP mode of Windows® 7 is supported by Professional edition or above.
For "Starter" or "Home Premium" edition, edition upgrade is required on the site of Microsoft Corporation (charged). |
|
|
|
|
| |
|
| [2] |
"Help" doesn't start. |
| |
| When Windows® 7 is used in the ordinary mode, "Help" of Windows is displayed, but "Help" of GP-PRO/PBIII for Windows C-Package03 is not displayed. (This does not occur in the Windows XP mode.) |
| |
| Workaround: |
| Download the program for Windows® 7 (WinHlp32.exe) from the Microsoft's download site and install it. |
| 1. |
Start GP-PRO/PBIII for Windows C-Package03 in the Windows XP mode of Windows® 7. |
| 2. |
Download and install the program for Windows® 7 (WinHlp32.exe) from the Microsoft’s download site. |
| |
[Download Site]
- Japanese
- English |
|
|
|
| |
|
| [3] |
There are notes concerning the save destination for project files. |
| |
In the specification of Windows® 7, files created in the "Program Files" in the ordinary mode are stored in the following path:
C:\Users\[User name]\AppData\Local\VirtualStore\Program Files\
(Each file installed with the installer is written in Program Files.)
When a project file is stored in the "database" that is the initial storage destination of GP-PRO/PBIII for Windows C-Package03, you may not know where the project file is stored in searching it with Explorer.
When the file is opened on GP-PRO/PBIII for Windows C-Package03, you may misunderstand that the file is stored in the "database" folder in "Program Files" because the file is stored in the "database" folder.
→ Workaround
In the Windows XP mode of Windows® 7, the differences as noted above do not occur.
To use the file that has been stored in the ordinary mode of Windows® 7 when the Windows XP mode is selected, make the settings to access the ordinary mode drive in the Windows XP mode. (→ Settings)
On the other hand the file that has been stored in the Windows XP mode cannot be accessed in the ordinary mode.
|
|
| Workaround 1: |
| Without using Explorer, select the project file directly from GP-PRO/PBIII for Windows C-Package03. |
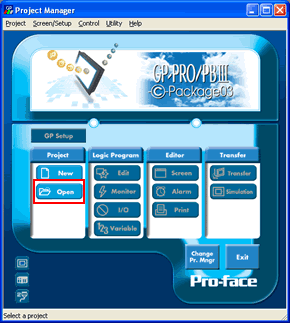
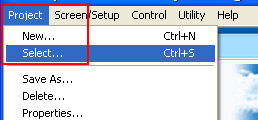
| Start GP-PRO/PBIII for Windows C-Package03 and then select the project file after clicking the [Open] button. Or click [Select] on the [Project] menu. |
 |
 |
|
| |
| Workaround 2: |
When you want to access the project file with Explorer, refer to the following site.
C:\Users\[UserName]\AppData\Local\VirtualStore\Program Files\proface\propbwin\database |
| |
| Workaround 3: |
| Save the project file somewhere except "Program Files", for example on the desktop. |
|
|
| |
|
|

