![]()
-
Please refer to the Settings Guide for details.
 33.6.1 GP-Pro EX Simulation Setting Guide
33.6.5 External PLC Simulator Settings Guide
![]()
Please refer to the Settings Guide for details.
![]() 33.6.1 GP-Pro EX Simulation Setting Guide
33.6.1 GP-Pro EX Simulation Setting Guide
![]() 33.6.5 External PLC Simulator Settings Guide
33.6.5 External PLC Simulator Settings Guide
Start the external PLC simulator.
![]()
For required software, see the following.
![]() 33.5.1 Required Software
33.5.1 Required Software
Open the project file you want to simulate. From the [Project (F)] menu, select [Simulation (L)].
![]()
You can also use the keyboard shortcut Ctrl+T to start simulation.
You can also click ![]() from the State bar to start simulation.
from the State bar to start simulation.
The [External PLC Simulator Connection] dialog box appears.
Select the [Connects with an external PLC simulator] check box.
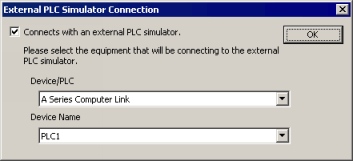
Select the [Device/PLC] or [Device Name] you want to simulate in the project. To specify a [Device/PLC] or a [Device Name], from the [Project] menu point to [System Settings] and click [Device/PLC]. In the [Device/PLC] dialog box, select the [Manufacturer] and [Series] from the list. Scroll down to [Device-Specific Settings] to specify the [Device Name] and [Settings].
![]()
Simulation can check operations of one device/PLC.
Click [OK].
The [Select Connection Type] dialog box appears.
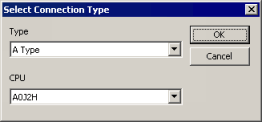
For the [Type], select the CPU type set up for the external PLC simulator.
For the [CPU], select the CPU set up for the external PLC simulator.
Click [OK] to display [GP-Pro EX Simulation] with the external PLC simulator operation status.
![]()
When you edit the project and run simulation again, close [GP-Pro EX Simulation]. Do the same when running simulation for a different project.
After editing or opening a project that you want to run simulation on, update the contents in [GP-Pro EX Simulation] using one of the following.
From the [Project (F)] menu, select [Simulation (L)]
Press [Ctrl]+[T]
Press [F12]
To exit simulation, in the [GP-Pro EX Simulation] dialog box, from the [Simulation (S)] menu click [Exit Simulation (X)] ![]() .
.