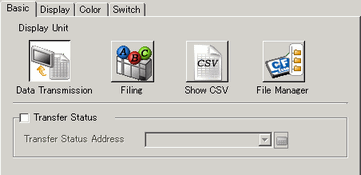
Transfer Status
Select an address to verify the transfer state and result status during the transfer.
Transfer Status Address
Set the address where the transfer status and result are stored.
![]()
Error Codes (Results reflected in the error status bits)
|
0 |
Completed Successfully |
Transfer completed successfully. |
|
1 |
Reserved |
- |
|
2 |
No Transfer Condition Number |
For transfer, the Condition Number that corresponds to the specified File Number (GROUP NO) does not exist. |
|
3 |
Internal Device Range Error |
When transferring from the CF card/USB storage to device/PLC, and when the transfer start address is specified as an internal device address, tried to transfer data that exceeds the internal device address range. |
|
4 |
No CF Card |
No CF Card is inserted or the cover is open. |
|
5 |
Read Error |
When transferring from the CF card/USB storage to the device/PLC, failed to read data on the CF card or USB storage device. |
|
6 |
Write Error |
When transferring from the device/PLC to CF card/USB Storage, failed to write to the CF Card or USB Storage. There may not be enough available space. |
|
7 |
CF Card Error |
The CF Card is invalid, unformatted, or the media inserted is not a CF Card. |
|
8 |
Reserved |
- |
|
9 |
Reserved |
- |
|
10 |
Reserved |
- |
|
11 |
No Condition |
Without the [Enable Data Transmission Feature] settings, a CSV file tries to display on the CSV display from a CF Card/USB storage. |
|
12 |
Write Error |
Data writing from CF Card/USB storage data transfer failed on the PLC. |
|
13 |
Read Error |
Data reading from CF Card/USB storage data transfer failed on the PLC. |
|
14 |
USB Storage is absent |
There is no USB storage device inserted into the display unit. |
|
15 |
USB storage error |
The USB storage device is invalid, unformatted, or the media inserted is not a USB storage device. |
Manual Transfer Timing Chart
Touch the transfer switch and the [Transfer Status Address] Transferring bit (bit 0) turns ON. When a data transfer is completed successfully, the Transferring bit turns OFF and the Transfer Completion bit (bit 1) turns ON. After confirming that the transfer is completed, turn the Transfer Complete Bit OFF.
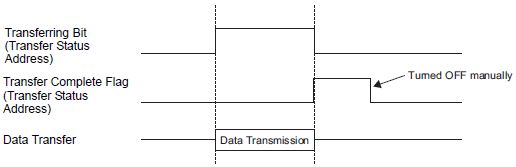

The Transfer Complete Flag (bit 1) is not turned OFF automatically. Turn it OFF from the device/PLC.