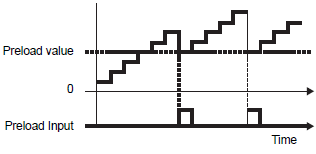
Use the Preload function to rewrite the current counter value with a value of your choice. Use the external input or the request flag to write the value.
Turn the preload request flag ON under the CH counter input control request in the system variable (#L_ExIOCntInCtrl) to write the current counter value with the system variable (#L_HSC*_PLV) using the preload feature. The Operation bit will differ depending on the CH to which you allocate the high-speed counter.
Summary
In GP-Pro EX, you can set up the initial value for each parameter. After the system is running, you can change parameters with system variables.
The procedure for setting the preload input is summarized below.
Setting Up Initial Values
Refer to the setup procedures for GP-Pro EX
Changing After System is Running
Set the preload value.
Set the parameter under [Request Special I/O Parameter change].
Under [Special I/O Parameter Change Completed], acknowledge that the parameter has been changed.
Rewriting value with the external input or the request flag
If you use the external input to write, acknowledge the value in [Show Counter External Input Completed].
If you use the request flag to write, acknowledge the value in [Special I/O State].
![]()
The [Request Special I/O Parameter Change] and [Special I/O Parameter Change Completed] operations reflect all the CH parameters you change.
Right after transferring, operations use parameter values set up in GP-Pro EX. Any restarts, which include going off-line, reset, and turning power OFF, use stored system variables as parameters.
Set Up Process in GP-Pro EX
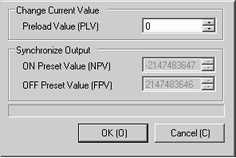
In [System Settings], select [I/O Driver] and click [High Speed Counter Settings] on the [Internal Driver 1] screen.

In the [High Speed Counter] dialog box, select the preload value from the Preload Value field.
Set Up Process with System Variables
The preload value is specified with system variables (#L_HSC*_PLV). The system variable name adjusts to match the CH pulse output to which it's mapped.
To specify the value from the system variable (#L_HSC*_PLV), change the parameter under [Request Special I/O Parameter Change] (#L_ExIOSpParmChg).
#L_ExIOSpParmChg

Request Special I/O Parameter Change
![]()
This variable uses the CH specified in the I/O driver settings as the 4-bit configuration information to request the special I/O parameter change.
a: CH1 special I/O parameter change request
c: CH2 special I/O parameter change request
e: CH3 special I/O parameter change request
g: CH4 special I/O parameter change request
You can also read the previous settings using the Operation bits below.
b: CH1 special I/O parameter read request
d: CH2 special I/O parameter read request
f: CH3 special I/O parameter read request
h: CH4 special I/O parameter read request
Acknowledge the completion in [Special I/O Parameter Change Completed]. Regarding the details of the variable, the watch bit will differ, depending on the CH to which you allocate the high-speed counter, as shown below.
Special I/O parameter change completed
![]()
a: CH1 special I/O parameter change complete
c: CH2 special I/O parameter change complete
e: CH3 special I/O parameter change complete
g: CH4 special I/O parameter change complete
You can also read the previous settings using the watch bits below.
b: CH1 special I/O parameter read complete
d: CH2 special I/O parameter read complete
f: CH3 special I/O parameter read complete
h: CH4 special I/O parameter read complete
The figure below shows the flag timing chart for the special I/O parameter change request and completion.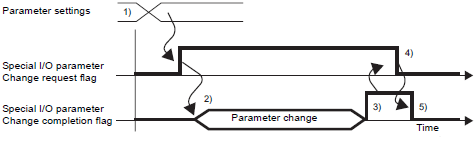
1) Set the preload value.
2) Turn ON the request flag for the special I/O parameter change to change the parameter.
3) Once the parameter is changed, the completion flag turns ON.
4) Acknowledge that the completion flag is ON and turn the request flag OFF.
5) When the request flag is recognized as OFF, the completion flag turns OFF.
Rewriting value with the external input or the request flag
There are two types of triggers for rewriting the current counter value with a value of your choice. They are [A] External input and [B] Request flag.
[A] External input trigger
When the signal of the preload input terminal that is specified in [I/O Driver] turns ON, the current value is written with the value stored in the preload value variable.
When the signal of the preload input terminal specified in [I/O Driver] turns ON, you can check whether the change was completed successfully. The setup procedure is shown below.
How to acknowledge the rewrite completion
Use the system variable (#L_ExIOCntInExtCtrl).
#L_ExIOCntInExtCtrl

Regarding the details of the variable allocated in [Counter External Input Completed], the watch bit differs, depending on the CH on which you allocate the high-speed counter, as shown below.![]()
a: CH1 preload complete
b: CH2 preload complete
c: CH3 preload complete
d: CH4 preload complete
Regarding the details of the variable allocated in [Acknowledge Counter External Input Completed], the operation bit differs, depending on the CH on which you allocate the high-speed counter, as shown below.![]()
a: CH1 preload completion acknowledged
b: CH2 preload completion acknowledged
c: CH3 preload completion acknowledged
d: CH4 preload completion acknowledged
The figure below shows a timing chart for [Preload Completed] and [Preload Completion Acknowledged].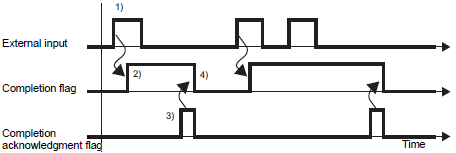
1) When the external input turns ON, the value is written with the preload value.
2) Once the write is complete, the preload completion flag turns ON.
3) Check the preload completion flag is ON and turn ON the preload completion acknowledged flag.
4) When the preload completion acknowledged flag is recognized as ON, the preload completion flag turns OFF.
[B] Request flag trigger
Turning on the preload request flag under the CH counter input control request in the system variable (#L_ExIOCntInCtrl) enables rewrite operation for the current counter value.
The preload-completed flag under the CH counter input-control response in the system variable (#L_ExIOCntInCtrl) turns ON when writing of the current counter value is completed. The Operation bit and Monitor bit differ depending on the CH to which you allocate the high-speed counter.
How to acknowledge the rewrite completion
Use the system variable (#L_ExIOCntInCtrl).
#L_ExIOCntInCtrl

For variables allocated in [Counter input control request], the operation bit will differ depending on the CH to which you allocate the high-speed counter, as shown below.![]()
Turn ON the 2nd bit of the CH to rewrite the value.
![]()
For variables allocated in [Counter Input Control Response], the watch bit differs depending on the CH to which you allocate the high-speed counter, as shown below.![]()
If the 2nd bit of the CH is 1, the value has been rewritten. If it is 0, the value has not been rewritten.
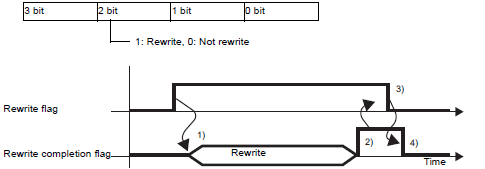
1) Turn ON request flag for the counter input control to rewrite the value.
2) Once the rewrite is completed, the rewrite completion flag turns ON.
3) Acknowledge that the completion flag is ON and turn OFF the rewrite flag.
4) When the rewrite flag is recognized as OFF, the rewrite completion flag turns OFF.