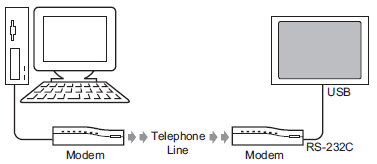
Connect a modem to your PC and the display unit to transfer the screen data from your PC to the display unit.
![]()
Ensure the PC has the proper communication settings for the modem. In the Windows [Control Panel], set up the [Phone and Modem Options].
The USB-Serial (RS-232C) Conversion Cable CA6-USB232-01 (optional accessory) is recommended for the connection between the display unit and modem.
If transfer is not successful even though the steps are followed, refer to the following.
![]() Maintenance/Troubleshooting - T.2.6 Cannot use modem for transferring
Maintenance/Troubleshooting - T.2.6 Cannot use modem for transferring
From the [Project] menu, select the [System Settings] and click [Modem].
Select the modem communication speed. The modem settings for GP-Pro EX are now complete.

![]()
For the proper modem settings, please read the manual of the modem.
Click the Transfer Project icon ![]() and launch the [Transfer Tool].
and launch the [Transfer Tool].
![]()
When the edited project has not been saved, a dialog box displays to confirm the save operation. Click [Yes] to save.
![]() 34.14.1 How Send Works
34.14.1 How Send Works
Click [Transfer Settings] and the following dialog box will appear. Select [Modem] in the [Communication Port Settings].

Select the modem. (You can confirm which modems are set up on the PC from the Device Manager dialog box in the Windows Control Panel.) Enter the telephone number of the modem connected with the display unit in the [Number] field.
If you do not need to transfer data in the CF Card Folder to the CF Card in the display unit, clear the [Transfer CF/SD Card Data] check box and click [OK].
Click [Send Project].
Set the connection key and click [OK]. Click the icon ![]() to show the key.
to show the key.
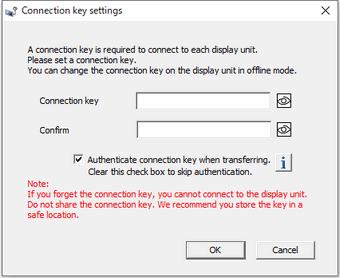

If you forget the connection key, you will not be able to connect to the display unit.
![]() 34.14.4 How the Connection Key Works
34.14.4 How the Connection Key Works
![]()
The [Connection key settings] dialog box appears only on the first transfer. The first time you transfer, you need to set the connection key.
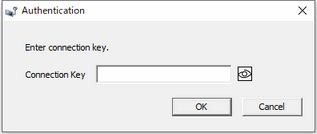
The [Authentication] dialog box appears for transfers from the second time onward. This will not appear if during set up of the connection key you clear the [Authenticate connection key when transferring] check box in the [Connection key settings] dialog box.
If you want to change the [Authenticate connection key when transferring] setting in the [Connection key settings] dialog box that appears on the first transfer, edit the setting offline.
![]() M.17.4.3 Security Settings - Connection Key
M.17.4.3 Security Settings - Connection Key
The transfer begins.
The following dialog box appears during transfer to check the communication status.
(The display unit changes to Transferring mode and communication with the device/PLC is suspended.)

When transfer is completed, the state of the dialog box changes from [Transferring] to [Transfer Complete].
Click [Close].
(The display unit is reset and the transferred project screen is displayed.)
Click [Close] to return to the Transfer Tool. Click [Close] again to close the Transfer Tool.