
![]()
When using display units that support the SD card, "CF"/"CF Card" is replaced with "SD"/"SD Card".
Display/Save in CSV
Specifies whether to display sampled data on the display unit screen or to save to an external storage.
When you display using the Sampling Data Display, or save the data to the external storage, you must check and set the format.
Basic Settings/Custom Settings
Select the format setting mode.
Basic Settings
Use a preset format to easily configure settings.
Custom Settings
Set a customized format.
Copy From Print Format
When the print format is set on the [Print] tab, copy the settings from the [Print] tab. Use this feature when you want to display/save in CSV using the print format.
The border row and border column are not copied.
CSV Control Word Address
Specifies whether to save as a CSV file. If so, set the control address to write the data to an external storage.
Two sequential word addresses are used as the area to write the command and its result (status), and File (the *****portion in "SA*****.csv".) The file number can be from 0 to 65535.

Save in
Select the save destination for the sampled data.
CF Card (or SD Card)
Write data to a CF card (or a SD card).
USB storage
Write data to a USB storage device.
Destination Folder
The following dialog box appears.
![]()
The following section lists models that support partitioning the destination folder.
![]() 1.5 Supported Features
1.5 Supported Features
Set number of files in destination folder on external storage
Select whether or not to partition the destination folder for the alarm history data and sampling data.
You can use the [Number of files per folder] field to control the number of files in one folder.
For example, [Number of files per folder] = [100], save sampling group 1 to CSV
|
Folder |
File that is saved |
|---|---|
|
\SAMP01\00000 |
SA00000.CSV to SA00099.CSV |
|
\SAMP01\00001 |
SA00100.CSV to SA00199.CSV |
|
: |
: |
|
\SAMP01\00655 |
SA65500.CSV to SA65535.CSV |
![]()
Refer to the following for information on destination folder and file names.
![]() 5.7.1 Destination Folder and File Name
5.7.1 Destination Folder and File Name
The setting applies to both alarm history and sampling data. You cannot set up the file/folder partitioning for only one of these features or set up different file numbers.
Number of files per folder
You can select the number of files in a folder, from [50], [100 (recommended)], [150], [200], [250], [300], [350], [400], [450], or [500].
When you select [100 (recommended)], the speed of the save process is faster compared to folder content that is divided.
![]()
The file number defines the destination folder. The number is not used to count the number of files in the folder, as the number of files in a folder can be larger than the file number.
Append Date/Time to file name
Specifies whether to append to the file name the time stamp (year, month, date, and time when the save to CSV operation starts).
When check box is cleared
The file name will consist of "SA" to indicate sampling data and the file number (5 digits). The file number value is stored in the address following the [CSV Control Word Address].
For example, when file number is 1, file name is "SA00001.csv"
When check box is selected
The file name will consist of "SA" to indicate sampling data, the file number (5 digits), and time stamp. The time stamp format is defined in the [Date/Time Format] field.
For example, When file number is 1, the save date and time is 2017/3/16 12:05:30, the Date/Time Format is _%Y%M%D_%h, the file name is "SA00001_20170316_12.csv".
![]()
For models that support appending the date and time to CSV file names, refer to the following.
![]() 1.5 Supported Features
1.5 Supported Features
Date/Time Format
When the [Append Date/Time to file name] check box is selected, set up the time stamp format with 16 single-byte characters or less. You can use single-byte alphanumeric characters, the following single-byte symbols, and the following macro symbols.
Single-byte symbols
% _ - ( )
Macro
|
Macro |
Description |
|---|---|
|
%Y |
Year (4 digit format) |
|
%y |
Year (2 digit format) |
|
%M |
Month |
|
%D |
Day |
|
%h |
Hours (24 hour time format) |
|
%H |
Hours (12 hour time format) |
|
%m |
Minutes |
|
%s |
Seconds |
|
% + any character except those above |
Adds any character string. "%" symbols at the beginning are not included in the file name. Example 1, when _%Y%M%D_%A is defined: SA00001_20170316_A Example 2, when _%Y%M%D_%% is defined: SA00001_20170316_% |
Preview
Based on the defined [Date/Time Format], displays an image illustrating the file name with the current date and time. When the format is invalid, the preview is not updated.
CSV Date Format
Select the [CSV Date Format] from [yy/mm/dd], [dd/mm/yy], [mm/dd/yy], [20yy/mm/dd], [dd/mm/20yy], [mm/dd/20yy], or [mm/dd]. "yy" displays the last two digits of the year, and "mm" and "dd" use two digits to display the month and date.
![]()
To read log data from the CF card using Pro-Server EX (GP log data upload and reading of Excel report log data), choose [yy/mm/dd]. If you select an option other than [yy/mm/dd], the date may be read out incorrectly.
When using Pro-Server EX (before V1.32) for the MES application's CF Sampling Data File Collection Action, choose [yy/mm/dd]. If you select an option other than [yy/mm/dd], either an error will occur or the incorrect date is saved in the database.
Enable FTP Transfer
Transfers sampled data saved in CSV format to the FTP.
When you select this check box, the [FTP] tab is displayed. Set up the destination FTP server and start transfer trigger in the [FTP] tab.
Send E-mail
When sampling data is saved to a CSV file, the file is sent as an attachment to email.
To set up this feature, from the [System Settings] - [E-mail] settings define the SMTP server and recipient email addresses.
![]() 5.4.21 System Settings [E-mail] Settings Guide
5.4.21 System Settings [E-mail] Settings Guide
Receiver Groups
Specify the receiver group number configured in [System Settings] - [E-mail].
Condition for Reading Alarm Value
When you enable [Alarm Settings] with the [Alarm] tab in the [Data Settings], and set [Address] in the [Alarm Action], you set the conditions for reading that address.
Always On
Continually read the alarm address.
Bit Change
Read when the [Trigger Bit Address] is ON.
Trigger Bit Address
Set the address that controls the timing for reading the alarm address.
Refine Search/Sort
Define if you will use the Refine Search function, which displays only data records that match specified conditions, and the Sort function, which re-order data records according to the condition specified.
For a list of models that support the Refine Search/Sort function, please see the following:
![]() 1.5 Supported Features
1.5 Supported Features
In the Sampling Data Display, when you touch the name field of an item, the Search dialog box appears.
Unlock
Clears the search/sort applied to the selected column.
Ascending
Sort from the smallest value to the largest.
Descending
Sort from the largest value to the smallest.
Filter
The Search Condition Entry keypad appears. See the following for information about the Search Condition Entry keypads.
![]() 20.10.3 Entering Search Conditions
20.10.3 Entering Search Conditions
Status Address
Specify the address where the search results and operation status are stored when you are using the Refine Search/Sort function. Use a sequence of 3 words.
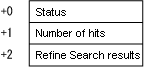
Status
Error codes are as follows:
|
Error code (decimal) |
Description |
Details |
|---|---|---|
|
0000 |
Completed Successfully |
The Search/Sort process is successfully completed. |
|
0001 |
Search in progress |
The Search/Sort process is successfully started. |
|
0100 |
No target record error |
As a result of search, no matching data record was found. |
|
0101 |
Search Menu Display error |
Other function is displaying the Search menu. Or, the Search menu cannot be displayed because all windows are in use. |
|
0102 |
Search Start error |
Search cannot be performed because other function is using Search/Sort or search results are currently displayed. |
|
0200 |
Registered Size error |
Sampled data size exceeds 1 MB |
|
65535 |
Unexpected error |
Search failed because of an internal issue. |
Search Hits
After the Search/Sort operation, the number of matching data records is stored.
Number of Refine Search columns
The number of columns with [Refine] specified is stored.
Row
Item Name (Horizontal) Rows
The number of item name rows can be from 0 to 3.
"Date" and "Time" will be automatically displayed in the first row of the Date and Time columns.
![]()
If you are using the Refine Search/Sort function, you must specify more than one row in [Item Name].
Use Sampling Address as Item Name
If the [Item Name (Horizontal) Rows] is not "0", select whether or not to display the sampling address as the data column item name. If selected, cells that have an address displayed in the Preview area cannot be edited.
Data Display Rows
If in the [Mode] tab's Extended area the [Overwrite old data after finishing the specified cycles] check box is selected, set the number of data rows from 1 to the [Occurrences] set on the [Mode] tab.

Adjust the number of data display rows to the [Occurrences].
Calculation Results
The number of calculation rows can be from 0 to 4. In the Calculation rows, you can display values (Total, Average, Max, Min) calculated from data from the designated [Occurrences].
![]()
The calculation data will not be exported to the CSV file, even if you have created a Calculation row.
If you selected [Enable multiple data types] in the [Address] tab, the Calculation row remains empty, unless you set it as a Numeric Data column.
Item Name (Horizontal)/Text Characters
Set the number of display characters for the item names (horizontal) and text rows from 1 to 100 single-byte characters.
When you double-click an item name row/text row cell in the Preview area, you can input text that is within the number of characters set here.
Column Settings
Item Name (Vertical) Characters
Designate whether or not to display the item name column.
If designated, set the number of item name column's characters from 1 to 20 single-byte characters.
Data Display Columns
Displays the number of data columns.
Column Settings/Row Details
Select and click the column, calculation row, or item name (vertical)/(horizontal) in the Preview area, and a dialog box to configure detailed settings appears.
![]() 25.11.5.1 Display/Save in CSV (Custom Settings)/Date
25.11.5.1 Display/Save in CSV (Custom Settings)/Date
![]() 25.11.5.2 Display/Save in CSV (Custom Settings)/Time
25.11.5.2 Display/Save in CSV (Custom Settings)/Time
![]() 25.11.5.3 Display/Save in CSV (Custom Settings)/Data Settings - Data Type
25.11.5.3 Display/Save in CSV (Custom Settings)/Data Settings - Data Type
![]() 25.11.5.4 Display/Save in CSV (Custom Settings)/Data Settings - Style
25.11.5.4 Display/Save in CSV (Custom Settings)/Data Settings - Style
![]() 25.11.5.5 Display/Save in CSV (Custom Settings)/Data Settings - Alarm
25.11.5.5 Display/Save in CSV (Custom Settings)/Data Settings - Alarm
![]() 25.11.5.6 Display/Save in CSV (Custom Settings)/Calculation Settings - Data Type
25.11.5.6 Display/Save in CSV (Custom Settings)/Calculation Settings - Data Type
![]() 25.11.5.7 Display/Save in CSV (Custom Settings)/Calculation Settings - Style
25.11.5.7 Display/Save in CSV (Custom Settings)/Calculation Settings - Style
![]() 25.11.5.8 Display/Save in CSV (Custom Settings)/Calculation Settings - Alarm
25.11.5.8 Display/Save in CSV (Custom Settings)/Calculation Settings - Alarm
![]() 25.11.5.9 Display/Save in CSV (Custom Settings)/Item Name (Vertical/Horizontal) Settings
25.11.5.9 Display/Save in CSV (Custom Settings)/Item Name (Vertical/Horizontal) Settings
Add this Column
Insert a column in front of the column selected in the Preview area. Choose from a [Date], [Time], [Data], or [Text] column. You can directly input the desired text in the [Text] column.
When inserting a [Data] column, the [Select Display Data] dialog box appears where you can select a data column (address) to add.

To add multiple addresses, drag the mouse to select consecutive columns. If you click columns to add while pressing the [Ctrl] key, you can select separate addresses.
![]()
If you save to an external storage (CSV output), the output does not include the [Text] column. Also, when [Date] line and [Time] line are multiple set, each line is output to a fixed position.
Move Right/Move Left
Move the column you selected in the preview area to the right/left.
Add this Row
Insert a [Text] row in front of the row selected in the Preview area. You can directly input the desired text in the [Text] row.
![]()
If you save to an external storage (CSV output), the output does not include the [Text] column.
When multiple calculation rows are set, you cannot input a Text row between two calculation rows.
Move Up/ Down
Move the [Text] row selected in the Preview area upward/downward.
Preview area
Displays the set contents with the selected format.
If [Overwrite old data after finishing the specified cycles] is selected on the [Mode] tab's Extended settings, only one data row will display. If the [Overwrite old data after finishing the specified cycles] check box is cleared, the data rows equal the designated [Occurrences].
When [Overwrite old data after finishing the specified cycles] check box is selected

When [Overwrite old data after finishing the specified cycles] check box is cleared
