In the following steps, you set up sampling to retrieve 5 data records at a regular interval, as long as bit M100 is ON.
-
In the [Common Settings] menu, click [Sampling] or  to open the following dialog box.

-
Click [New] to open the [New Sampling Group] dialog box. Enter the sampling group number and click [OK]. The [Sampling (Number)] dialog box opens.

-
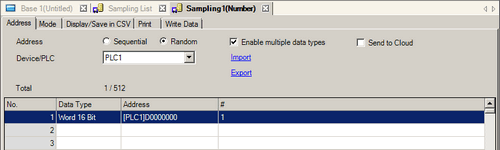
In the [Address] tab, select [Random] and [Enable multiple data types].
-
In the [Device/PLC] select the device you want to sample.
-
Specify the [Data Type] and [Address] in their respective columns.
If you want to use sequential addresses of the same data type, enter the number of words you want to use in [#]. If the [Data Type] is [Text], enter the number of characters in [#].


-
To delete settings in a row, right-click the row in the address list, and select [Delete]. (or press the [Delete] key). In the confirmation dialog box, click [Yes] to remove the settings. This row is blank now and the rows below it remain in their previous locations.
-
On the [Mode] tab, for the [Execution Condition] select [Constant Cycle while Bit is ON].
-
In [Sampling Permit Bit Address], set the bit address to control the data collection operation.
-
Specify the frequency and the number of data to collect in the [Sampling Frequency] area and [Occurrences] field.

-
In the [Data Clear Bit Address] field, enter the address (for example, M50) to delete the collected data. When this bit is turned ON, all data from sampling group 1 stored in the display unit are deleted.
-
Optionally, you can also set up the [Data Full Bit Address] to check if sampling has reached the defined number of [Occurrences].
-
Click [Extended] to open the [Extended Settings] dialog box. Ensure that the [Add Time Data] is selected. Click [OK] to close the dialog box.
-
Open the [Display/Save in CSV] tab. Select the [Display/Save in CSV] check box, and click [Custom Settings].
-
Select [Refine Search / Sort] and specify the status address (for example D300).

-
Set the Display Format. Set [Item Name (Horizontal) Rows] to 1. Specify the number of characters in the [Number of Characters For Item Name (Horizontal)/Text] and the [Item Name (Vertical)] fields.
-
In the preview area, double-click each cell for Item Name (Horizontal) and input the Item Name.
Also, move or add column(s) as necessary.

-
Select the [Date] column and click [Column Details]. The [Date Set] dialog box appears. Change the date format to [mm/dd]. Click [OK] to close the dialog box.
-
Select the [Data 4] column and click [Column Details]. The [Data] dialog box appears. Change the data type to [Float]. Set [Total Display Digits], [Font Color] and others in the [Style] tab as necessary, and click [OK] to close the dialog box.

-
The number of digits you specify in the [Total Display Digits] should be larger than the number of digits of actual sampled data. Search and sort operation is performed based on the sampled data. If the actual number of digits is more than the display digits specified, the result shown on display will not match the condition you specified.

-
Open the editing screen, and from the [Parts] menu select [Sampling Data Display], or click  to place the part on the screen.
-
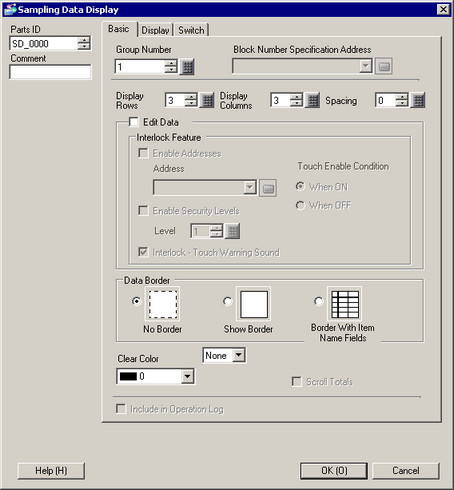
Double-click this part to open the [Sampling Data Display] dialog box.
-
Define the sampling group you want to display on the screen. Set the Group No. to "1".
-
Set the [Display Rows] and [Display Columns].
-
Select [Edit Data], if you wish to edit the sampling data on the screen. This requires you to set up a keypad for editing the data. At runtime, when you touch the data, the screen changes to the editing screen enabling you to edit the data by using the keypad.
However, you cannot edit data while Search/Sort results are displayed.
-
Select the [Border with Item Name Fields]. Also, change the [Clear Color] as necessary.
-
On the [Display] tab, select the font type and size.

-
On the [Switch] tab, select the desired scroll switches, as well as, [Clear All] and [Update] switches.
Click [Select Shape] to choose the shape of the switch and add label and text color. Click [OK].

You have configured the Sampling Data Display.
 25.11 Common Settings (Sampling) Settings Guide