Configure the settings for an external input device.
From the [Project] menu, select [System Settings], and click [Input Equipment] to open Input Equipment Settings dialog box.
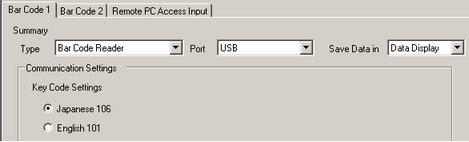
From the [Type] drop-down list, select [Bar Code Reader]. For the [Port], select [USB]. For [Save Data in], select [Data Display].
![]()
-
In order to use EZ Numpad, you must configure [Input Mode] from the [Numpad] tab. In order to use EZ Numpad for entering data, select [Use tenkey].

Open the screen and configure the Data Display part used to display USB keyboard inputs.
On the [Parts (P)] menu, select [Data Display (D)] and then click [Numeric Display (N)], or click the ![]() icon, and place it on the screen.
icon, and place it on the screen.
Double-click the placed element. The Data Display dialog box appears.

Click [Select Shape] and select the appropriate shape.
In [Monitor Word Address], set up the address to store the displayed numeric value.
Select a data type in [Data Type], and then select the [Allow Input] check box.

Click the [Data Entry] tab and select [Bit]. Set the [Allow Input Bit Address]. Data input is enabled when this bit address is ON.

Click [Extended] and select the [Input Barcode] check box. This enables you to input data from an external input device.

![]()
-
When using the EZ Numpad, the [Input Barcode] setting is not required.
If necessary, set the Data Display color and text on the [Color/Alarm] and [Display] tabs, and click [OK].