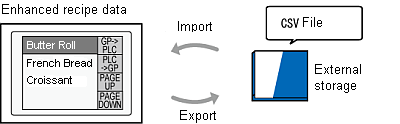
Import and export the display unit's enhanced recipe data with CSV files.
To import or export enhanced recipe data in the display unit, from the [Common Settings] menu select [Enhanced Recipe], select the [Import/Export on Display Unit] check box and set the [Data Storage] location.
![]()
For information about the CSV file format, refer to the following. 26.20.2 Enhanced Recipe - CSV File Format
Please refer to the Settings Guide for details.![]() 26.27.2 Recipe Group (Recipe Group 1) Settings Guide
26.27.2 Recipe Group (Recipe Group 1) Settings Guide
For more information about system variables, please see the following.![]() A.2.2 HMI System Variables - #H System Variables
A.2.2 HMI System Variables - #H System Variables
Even if the recipe group ID or recipe ID is changed during the import/export process, uses the values in #H_RecipeGroupID and #H_RecipeID at the start of the process.
Do not perform the following operations during import/export.
Enter offline mode
Transfer a project
Turn off or reset the display unit
Export
Store enhanced recipe data in the display unit's external storage as a CSV file.
Attach external storage to the display unit.
Write the ID of the recipe group you want to export to #H_RecipeGroupID.
The group name of the selected enhanced recipe group is stored in #H_RecipeGroupName.
Turn ON #H_RecipeControlCSVExport to start exporting. During export, Bit 4 in #H_RecipeProcessing turns ON.
In the [Common Settings] menu's [Enhanced Recipe] screen, create the "Recipe" folder in external storage as defined in the [Data Storage] list, and create the defined CSV file. Once export is completed, #H_RecipeProcessing bit 4 turns OFF and bit 5 turns ON.
The file name is as follows.
For example, if #H_RecipeGroupName is "Branch A" and #H_RecipeGroupID is "1", the file name is "00001_Branch A.csv".
Confirm #H_RecipeProcessing bit 5 turns ON and then turn OFF #H_RecipeControlCSVExport. Bit 5 for #H_RecipeProcessing automatically turns OFF.
Timing Chart
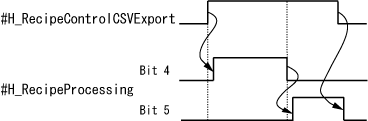
Bit4: Exporting (automatically turns OFF when export finishes).
Bit5: Export finished (when #H_RecipeControlCSVExport switches to OFF, this automatically turns OFF)
Import
Load enhanced recipe data (CSV file) from external storage to the display unit.
Attach external storage with the enhanced recipe data (CSV file) to the display unit. (Use the external storage from the [Common Settings] menu's [Enhanced Recipe] screen, in the [Data Storage] field.)
Turn ON #H_RecipeControlCSVImport. During export, #H_RecipeProcessing bit 6 turns ON.
Data in the CSV file is imported to the display unit, overwriting any existing enhanced recipe data.
Once import is complete, #H_RecipeProcessing bit 6 turns OFF and bit 7 turns ON.
Confirm bit 7 for #H_RecipeProcessing turns ON and then turn OFF #H_RecipeControlCSVImport. Bit 7 for #H_RecipeProcessing automatically turns OFF.
Timing Chart
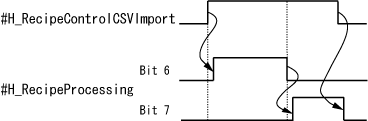
Bit6: Importing (automatically turns OFF when import finishes).
Bit7: Import finished (when #H_RecipeControlCSVImport switches to OFF, this automatically turns OFF)
![]()
Once import starts, the display in the Enhanced Recipe Data List is temporarily hidden.
You can import to the display unit settings exported as a CSV file and defined in the [Common Settings] menu's [Enhanced Recipe] screen.
The following operations will interrupt importing.
There is a character that does not correspond to the data format
You exceed the data range for the corresponding data format
The data format is [Text] and there are 72 or more bytes of characters